
Contents
- Introduction
- Basic Custom File Naming
- Overwriting Existing Files
- Advanced Custom File Naming
- Mix and Match
- Errors
- Questions and Comments
Introduction
Extract Pages is a great InDesign script to divide an existing InDesign document into separate pages or groups of pages.
Each page, or group of pages, is saved as a separate file.
The script will produce InDesign, PDF, interactive PDF, JPG, PNG and InDesign snippet files and any combination of these.
The filename pattern can be modified by the user. Some very powerful building blocks allow for a wide variety of filename patterns to be specified easily.
Everything described below is equally applicable whether you are producing PDF, InDesign, PNG or JPEG files or InDesign snippet files. All file-naming options are available for all file formats. For simplicity we presume you are creating InDesign files, but the naming results are identical if you are creating other files from your source file.
For ease of use, a useful “default” filename pattern is also available for users for whom this is sufficient.
This article will describe how to use the advanced filenaming feature of Extract Pages.
Basic Custom File Naming
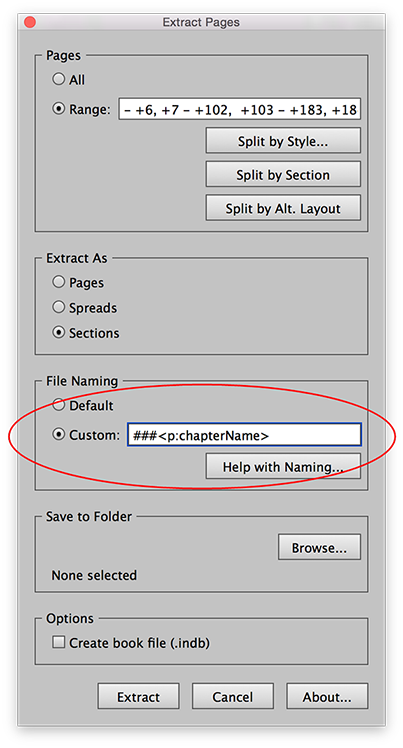
To use a custom filenaming scheme, select the “Custom” radio button, and type the filenaming scheme you would like to use.
For instance, if you type:
Ace Food
and choose to save each page of a 10-page file as separate files, the file names will become:
Ace Food.indd

Ace Food-1.indd

Ace Food-2.indd

...

Ace Food-9.indd
Overwriting Existing Files
Extract Pages will not overwrite existing files in the same folder that have the same name.
So if a file called Ace Foods.indd already exists in the selected folder, Extract Pages will automatically modify the name to something that does not exist already: Ace Foods-1.indd.
If, as per the previous example, Ace Foods-1.indd through Ace Foods-9.indd are all used, the first file will be called Ace Foods-10.indd.
The point is that Extract Pages will find a new name for all files, and will not overwrite existing files. So if needed, first manually delete all existing files from the selected folder.
Advanced Custom File Naming
In addition to simple custom file names, any of the following special codes can be inserted one or more times into the Custom filename field to create advance naming schemes.
First Page <fp> and <+fp>
The <fp> code will be replaced, for each extracted file, with the name of the first page of that file. The <+fp> code will be replaced, for each extracted file, with the number of the first page of that file. For example, typing the following into the Custom field (using the 10-page Ace Foods example mentioned previously):
Ace Foods Page <fp>
will result in the following files:
Ace Foods Page 1.indd

Ace Foods Page 2.indd

...

Ace Foods Page 10.indd
Last Page <lp> and <+lp>
As with the <fp> code, the <lp> code will be replaced with the name of the last page of the extracted file. The <+lp> code will be replaced with the number of the last page of the extracted file. For example, if we were to split the Ace Food file into two (pages 1-5, and pages 6-10), typing the following in the Custom field:
Ace Foods Pages <fp>-<lp>
would result in the following 2 files:
Ace Foods Pages 1-5.indd

Ace Foods Pages 6-10.indd
File Name <fn>
The <fn> code just inserts the full name of the original file.
So, if the original file was called Ace Foods.indd, and it is divided into 2 sections as above, typing
<fn> Pages <fp>-<lp>
would again result in:
Ace Foods Pages 1-5.indd

Ace Foods Pages 6-10.indd
Counter #
The hash sign # can be used as a placeholder for a simple counter. For the first extracted file, it will have a value of 1. For the second, 2, and so on.
Multiple ### can also be used to pad the number with leading zeros. So ### will be replaced with 001 for the first file and 002 for the second, etc.
For example, typing the following into the Custom field
## Ace Foods
will result in
01 Ace Foods.indd

02 Ace Foods.indd
… and so on for each file created.
Conditional Text [ ]
Use square brackets [ ] to mark text as conditional.
Conditional text will only be used if the extracted file contains more than 1 page.
This is useful for sorting out singular/plural issues.
For example, if Ace Foods.indd contains 10 pages, and we want to divide it into 3 files: pages 1-3, page 4, and pages 5-10, we could type the following into the Custom field:
### <fn> Page[s] <fp> [through <lp>]
This would result in the following 3 files:
001 Ace Foods Pages 1 through 3.indd

002 Ace Foods Page 4.indd

003 Ace Foods Pages 5 through 10.indd
Because the 002 file has only a single page (page 4), the “s” after the word “Page” is omitted, as is the entire phrase “through <lp>”, since these were placed inside square brackets.
Section Marker <sm>
Use the <sm> code to insert the contents of the first section marker of the extracted file. (Note: InDesign has two similar fields in the Numbering and Sections window: Section Marker, and Section Prefix. They serve a slightly different purpose. The <sm> code picks up the Section Marker field, not the Section Prefix field!)
Alternate Layout Name <alt>
Use the <alt> code to insert the name of the alternate layout of the extracted file.
Paragraph Style <p:styleName>
Here’s where things start getting really powerful!
What the <p:styleName> tag does, is search each extracted file for the paragraph style specified (replace ‘styleName’ with the name of the desired paragraph style).
The text of the first such paragraph that is found in the extracted file will be inserted where the tag is.
Note: Any characters in the paragraph that are invalid for use as part of a filename will be stripped out of the result.
For example, let’s say we are preparing business cards for the 3 employees of the Ace Food company. We have an InDesign file with 3 pages of cards, one per employee (Mark Smith, Sue Lee, and Joe Levy).
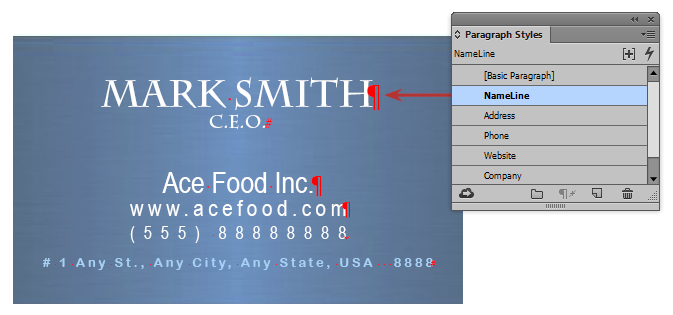 The cards are set up in InDesign so that the employee name has the paragraph style “NameLine” applied to it in each of the three cards.
We now want to split this InDesign file into 3 smaller files, one file per business card, and we want the name of each file to be the name of the employee whose business card it is.
In such a case, typing the following in the Custom field
<p:NameLine>
will result in the following 3 files:
Mark Smith.indd

Sue Lee.indd

Joe Levy.indd
Of course, it is possible to use multiple paragraph styles as well.
If, for example, we also want to include the employee’s role (which appears on each business card, and has the paragraph style “JobLine” applied to it), we could type:
<p:NameLine> <p:JobLine>
and the 3 files would then be called
Mark Smith CEO.indd

Sue Lee VP.indd

Joe Levy Food Specialist.indd
Character Style <c:styleName>
The <c:styleName> tag searches each extracted file for the character style specified (replace ‘styleName’ with the name of the desired character style).
For details, see the explanation for the <p:styleName> tag, above, as this tag is identical to that one, except that it uses character styles instead of paragraph styles.
Grep Search <g:searchName>
This is the last, and perhaps the most powerful, of all the building blocks so far.
GREP is an advanced InDesign feature, and if you are not familiar with GREP it is well worth reading up on! However, It is outside the scope of this page to go into the intricacies of GREP, so I am presuming that you are familiar with how to use GREP in InDesign to create a powerful filtered search phrase.
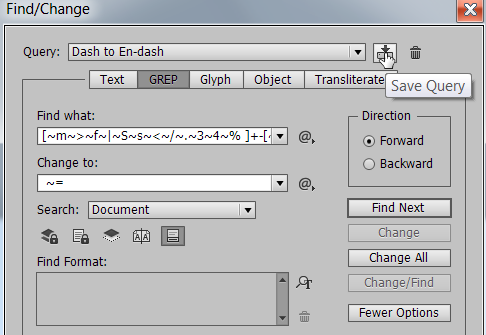
InDesign lets the user save GREP searches for reuse later. All that is needed is to click on the little disc icon in the GREP search window, and type in a name.
 This is where the fun begins! You can use one or more GREP searches created previously in InDesign with Extract Pages’ custom naming feature to create a really powerful naming structure!
To do this, use the <g:searchName> tag, and replace “searchName” with the name of your saved GREP expression.
For instance, let’s say you have previously saved a GREP search that finds all underlined text that has the “Address” paragraph style applied to it (presuming you have an “Address” paragraph style in the document, of course). You saved this GREP and called it “FindUnderlinedAddress”.
To use this GREP search with Extract Pages, just type:
<g:FindUnderlinedAddress>
Extract Pages will search each extracted document for the first result of this GREP search, and use it as the file name for that extracted file.
Note: This GREP search code cannot be used to change what is found. Only the “Find” part of the query is used. The “Change” part of the query is ignored.
Mix and Match
All the above codes can be used multiple times to create a complex file-naming scheme. For example, typing the following into the Custom field:
### <c:Title> <p:LastName> <g:FirstThreeLettersOfFirstName> <p:CompanyName> Page[s] <fp>[-<lp]
might result in the following file names (of course, this very much depends on the details of the results of the GREP search and contents of the paragraph and character styles for each file in question):
001 Mr Smith Mar Ace Foods Inc Pages 3-10.indd

002 Mrs Sue Lee Top Foods Page 9.indd

etc. etc.
Errors
If the custom naming scheme results in a filename that cannot be used by the operating system, Extract Pages will silently save that file with the default naming scheme.
Questions and Comments
Having difficulty putting together the right naming scheme? Post a comment below and we’ll be glad to try and help!
Bahadir Bedenlier
July 26, 2017 1:02 amHi,
Thank you for creating such a useful script. This was exactly what I was looking for except with one small feature:
Is it possible to save each page/spread as a separate PDF with their page layout names?
I create multiple alternative layouts of the same or similar designs in variety of sizes. This allows me to edit the master layout and all other layouts update automatically. I name each layout accordingly with their dimensions (e.g. 2x3Necker, 3x4shelftalker, 24x36Poster…so on) Then I need to export these layouts as individual PDFs for different services with proper layout names.
Is this script can do that or it can be added as a feature?
Thank you,
Bahadir
Ariel
July 26, 2017 1:28 amHi Bahadir,
(Answer updated July 2018): YES! Extract Pages now allows you to extract PDFs from your source InDesign file, and you can base the filenames of the resulting PDF on a paragraph style, character style, or GREP search. So the filename will reflect the content that appears on the actual page, if you wish.
With a few clicks, you can create PDF files of each spread in your source InDesign file. Each PDF file will be named as desired, and you can even create multiple PDFs of each spread (for example, hi-res and low-res versions) and have them automatically go into the correct folders on your harddrive! 2 or 3 clicks and you’re done!
Julian
April 1, 2020 4:52 pmHi there – just bought your Extract Pages script. Really impressive stuff. Can I ask if it’s possible to name extracted pdfs based on their section prefix?
eg I have a bunch of sections in my document with section prefix “FR”, “DE”, “IT” etc. I want to export pdfs for each section named:
file_name FR.pdf
file_name DE.pdf
file_name IT.pdf
etc
Regards,
Julian
Ariel
April 1, 2020 5:42 pmHi Julian, code (Section Marker) do what you want?
Does the
Ariel
Julian
April 1, 2020 6:22 pmHi Ariel, thanks for your quick reply. I’ve tried “” (without quotes) in the File Naming: -> Custom: text box but that is not putting a variable in the output filename. e.g. – I am putting “filename ## ” (without quotes) in the Custom: text box and I get:
filename 01 .pdf
filename 02 .pdf
filename 03 .pdf
etc
Julian
PS – just in case – by “Section Prefix” in my original query I meant the text in Numbering & Section Options->Page Numbering->Section Prefix: box, in case that’s possible
Ariel
April 1, 2020 6:27 pmHi Julian,
Hmm, I think your comment has been mangled by WordPress. I can’t see anything between the quotes. Perhaps let’s continue by email? admin (at) id-extras.com
As for the Section Prefix issue, I think that the answer is not quite. Extract Pages can insert the section marker into the filename, but not (for now) the section prefix.
Julian
April 1, 2020 6:25 pmPS – I see WordPress is removing tags – the first “” above should be:
less-than-sign sm greater-than-sign
The filename one should read:
filename ## less-than-sign sm greater-than-sign
Ariel
April 1, 2020 6:30 pmOk, thanks, that makes it clearer.
Anyway, what you’re getting makes sense, I guess, since the sm marker will insert the section marker, not the section prefix.
Ariel
PS Enclosing the marker in pre tags doesn’t seem to work vis-a-vis WordPress.
Julian
April 1, 2020 6:50 pmThanks Ariel – confirming this query resolved by copying the Section Prefix tag in Numbering & Section Options down into the Section Marker: text box.
Thanks for your help with this.
Julian
Roy
April 20, 2020 7:58 pmStill loving this script. In addition to wanting the ability to save presets of groups of presets, I recently noticed the counter # tag causing me problems. Specifically, when exporting pdfs of #10 or #9 envelopes. Instead of getting Client #10 env Proof, Client #10 env Print, Client #10 env Vendor, I am instead getting Client 110 env Proof, Client 210 env Print, Client 310 Vendor. So now I have to undo what Extract Pages has done to #10. Is there a way to prevent the counter tag from activating when the # is part of the original file name?
Thanks in advance. :)
Ariel
April 30, 2020 1:07 amHi Roy,
Glad you’re loving the script!
But indeed, for now it is impossible to use the # character as part of a file name, unfortunately, as it collides with the “counter” special-character as you have discovered.
In the next update, I will try to add an escape character to make this possible.
Meanwhile, perhaps consider using one of the following workarounds. Instead of a true # sign, how about using this: ⋕ (the ‘equal and parallel to’ sign), or ♯ (the ‘music sharp’ sign), or even ⌗ (the ‘view data square’ sign, whatever that is!)
Thanks,
Ariel
Roy
April 30, 2020 1:19 amGood suggestions. I’ll give one of those a try for the time being. Thank you.
Ken Shepherd
July 8, 2020 11:34 pmHello,
I have a long datamerge document and I would like to batch extract every 37 pages and name the file with the text in named text container, is this possible? I will buy this script if this is possible.
Thanks,
-ken-
Ariel
July 9, 2020 12:09 amHi Ken,
Sounds like it should be possible. (You’ll need to paste in the page ranges manually: 1-37, 38-74, etc.)
Every 37 pages should be extracted, but to what file format? .indd? .pdf? Both are possible, in fact.
And when you say the text is in a named text container, what exactly do you mean? Is it regular plain text in a text frame?
Thanks,
Ariel
Jim DeBoer
July 15, 2020 3:59 amCan I export each page as a .PDF, but separate each spread into a folder?
I have 200 spreads with 2 – 6 pages per spread. I’d like each page an individual PDF, but each spread a different folder. Is this possible? Thanks for your help
Ariel
July 15, 2020 4:14 amHi Jim,
You can of course export each page as a pdf, and you can also (as a second step) export each spread (as a pdf, or a mini InDesign file), all with very flexible custom naming. But you can’t export each spread into a separate folder, the exported spreads would all land up in the same folder (whichever you choose).
Ariel
Jim DeBoer
July 15, 2020 4:16 amHow would I get each spread to have a different name? I have the plugin,
Ariel
July 15, 2020 4:24 amIt depends what the name should be. But if the desired name of the file appears somewhere on the spread itself, say as a separate paragraph with its own paragraph style, you could pick up the contents of that paragraph and use it as the file name. See above for more details: https://www.id-extras.com/extract-pages-file-naming-help/#p
Jim DeBoer
July 15, 2020 4:29 amThe desired name is in a paragraph by itself, with a paragraph style of “Dutch” so I used but it did not work. The paragraph is on the spread, but not on a page. Does it need to be on a page? The file comes out with no name just .pdf, .pdf-1 etc on export.
Thanks
Ariel
July 21, 2020 1:05 pmHi Jim,
The paragraph with the name should be somewhere in the extracted file. But if you’ve got two pages, and you export page 1, and the name you want is on page 2, I don’t think it will work.
Ariel
Aleks
March 12, 2021 7:57 pmHi,
How do I disable “View after export” setting when creating Interactive PDF’s with the script?
Ariel
March 13, 2021 8:37 pmHi Aleks,
To change the interactive PDF export settings, export an interactive PDF manually from InDesign. The Settings window opens and you can change the settings there (for instance, uncheck the “View After Export” option. InDesign remembers these settings, so afterwards when exporting pages with Extract Pages those are the settings that will be used.
Ariel
Michael Bann
April 19, 2021 2:34 pmHello, thank you for this product. I have been using it for a few weeks now and it’s been very helpful. I am experiencing one issue. When I extract pages and set it to created individual files by a P Tag in my document, it works perfectly except for the first instance of the tag. The documents I create all have 6 pages and the script does them all fine but the first instance of the tag only results in a file with one page… not the 6.
Any ideas on this?
Ariel
April 20, 2021 4:10 pmHi Michael,
Can you post here what exactly appears in the “range” field after you choose to split the document by paragraph style?
Thanks,
Ariel
Michael Bann
April 21, 2021 11:35 amAriel, thanks for getting back on this
When I first open the script there is, what I believe the last used data. I clear it out and reselect the P Tag I use to divide sections.
What the script populates in the Range field is:
– +1, +7 – +12, +13 – +18, +19 – +24, +25 –
This from a file of 30 pages with 5 sections of 6 pages each. The P tag is on the first page of those sections.
Thanks
Ariel
April 21, 2021 1:05 pmHi Michael,
What version of Extract Pages are you using? This reminds me of an old bug which was fixed a while ago. Latest version is 1.7.4
Arie
Michael Bann
April 23, 2021 9:27 amAriel, the link I got with my purchase on 3/20 was to download version 1.7.3
Ariel
April 27, 2021 9:29 pmHi Michael,
You can download the latest version here at any time: https://www.id-extras.com/shopping-cart/my-account/
Let me know if 1.7.4 fixes this issue for you. If not, I’ll probably need you to send me your feel to test with.
Thanks,
Ariel
Michael Bann
April 21, 2021 1:08 pmAriel,
I just purchased a license on March 20 2021
The download link I was sent was for version 1.7.3
Where might I get 1.7.4 ?
Cheers
Michael Bann
April 28, 2021 1:19 amAriel, I went to that link, entered my email and the link sent to me is for version 1.7.3
Not 1.7.4
Ariel
April 28, 2021 1:21 amHi Michael: It does look like it, but in fact if you unzip the package you’ll see it’s 1.7.4.
Roy
May 19, 2021 10:01 pmHi Arial,
Another request. I format a lot of books and it would be handy to include the page count in the file name, aids in creating proper spine width. Problem is, the command seems to use the page number of the last section (10 pre-pages [i–x] plus 141 body pages [1–141]) and the filename appends 141, but I need the absolute page number, which is 151. Any chance of looking into adding the ability to choose which is wanted?
Thank you
Ariel
August 17, 2021 11:00 amHi Roy,
Good suggestion to add an “absolute page numbering” shortcode as well. I’ll think about it for the next upgrade.
Thanks,
Ariel
Warren Mayall
August 17, 2021 1:00 amHi Arial,
Am I able to use “Extract Pages” triggered by a button in a PDF. There are 10 pages in the PDF.
I have a form that has many form fields each page. If a customer completes the form fields on a page but then needs to complete a new page I want a button he can press that will give him a copy of just that page. He would then complete this page and send it in as an addendum to the first pages.
Cheers
Warren
Ariel
August 17, 2021 10:59 amHi Warran,
Extract Pages is made to extract pages from an InDesign file (it can create PDFs, .indd, jpgs, etc. – but all based on an InDesign file) only.
You’re looking for some kind of a button in an interactive PDF that will save each page of the PDF as a separate file. I think it may well be possible to add a custom on-click event to a button in Acrobat that will do this, but it’s not something that you’d do with Extract Pages.
Ariel
Frank
September 5, 2023 3:09 pmHi! I would like to export al pages to individual pdfs and attaching always page 1 of the indd-file to it. So is it possible to export with a schema like p2 + p1, p3 + p1, p4 + p1, … ?
Thanks,
Frank
Ariel
September 5, 2023 10:46 pmHi Frank,
Yes, absolutely.
In Extract Pages, in the Range field, type: 2,1; 3,1; 4,1; … etc. (You may want to use Excel or something to create the list of numbers you need.)
Make sure to select the option “Extract as Groups of Pages”.
I think that should work.
Ariel
stefan
April 3, 2024 11:58 amHello,
is it possible to split an multiple page Indesign document in double page documents.
e.g.
we have 10 pages in on indesign document and want to split the document in 5 documents with double pages and save as 5 documents
thanks
stefan
Ariel
April 3, 2024 12:01 pmHi Stefan,
If I’ve understood correctly, you have a 10 page document, and you want to produce 5 separate docs from it: (1) 1-2.indd, (2) 3-4.indd … (5) 9-10.indd?
If so, then yes, certainly, Extract Pages can do that (with very flexible file-naming options).
Ariel