
Using “Center Table Columns”
Introduction
The Center Table Columns script exists to help you center-align columns of numbers within a table column, while still allowing decimal or right-alignment of the numbers with each other in the column.
Installation
Center Table Columns consists of a single CenterColumnsInTable.jsx file. One good tutorial on how to copy this into the correct folder on your computer can be found at https://www.danrodney.com/scripts/directions-installingscripts.html
Running the script for the first time
After installing the script, display InDesign’s Scripts panel on the screen (Window > Utilities > Scripts), select one or more table cells or columns and double-click on the CenterColumnsInTable.jsx script in the Scripts panel.
If you click About, and then select Create menu item, the next time that you quit and then start InDesign, you’ll see an Id-Extras menu added to your menu bar. You can then choose Center Table Columns from this menu to run the script if you wish.
Using the script
When you select some cells or columns and run the script, a dialog box appears. This dialog box is “sticky” and will remain on the screen until you click the Close button. If you have enough room on your screen, you can just leave it on the screen, much like a panel, and continue working on your layout. That way the ability to center columns is just a single click away.
When you click the Apply button, the text in all the cells in your selection will be center aligned according to the options you’ve selected in the panel. The script performs its magic by adjusting the right indent of the text in each selected cell.
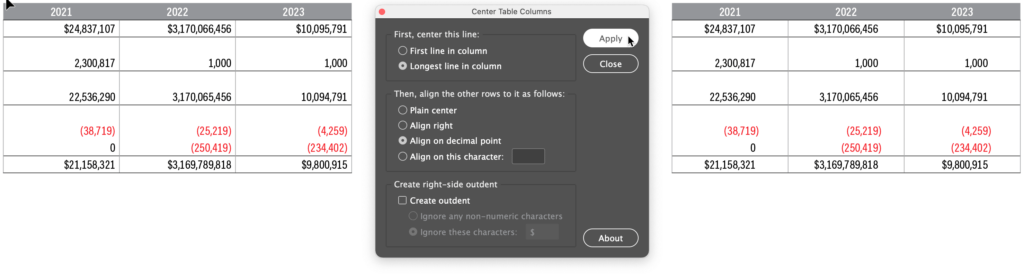
A before (left) and after (right) example of what the Center Table Columns script does. Each column of numbers is center-aligned within the column based on the longest number in the column. In addition, the numbers are decimal aligned with each other.
In certain situations, centering a column of numbers based on the longest number doesn’t “look” right if the longest number is way down near the bottom of the column. Sometimes you’ll want to base the alignment on the number at the top of the column near the column head. The First, center this line: option in the dialog box lets you choose between centering based on the longest line in the selection, or based on the first line in the selection.
Next, in the next section of the dialog, there are 4 different alignment options. After centering the longest line (or the first line, see above):
Plain center just applies the normal InDesign center paragraph alignment to all the text in the selection.
Align right right-aligns the contents of the other selected cells with this line.
Align on decimal point decimal-aligns the contents of the other selected cells with this line.
Align on this character custom-aligns the contents of the other selected cells with this line based on the character entered in the text field. This is useful if you wanted to align cells based on a hyphen, for instance. Note: if you enter multiple characters in this field, they are treated as a continuous string, not separate characters. If you type -+ in the field, characters will be aligned on the hyphen character followed by a plus, not a hyphen character or a plus character.
The final section of the dialog lets you create a right-side outdent. This is useful for “hanging” custom characters to the right of the aligned numbers. This is great for footnote references. View a helpful video that explains the outdent feature here: https://youtu.be/r2BytWmEkQA
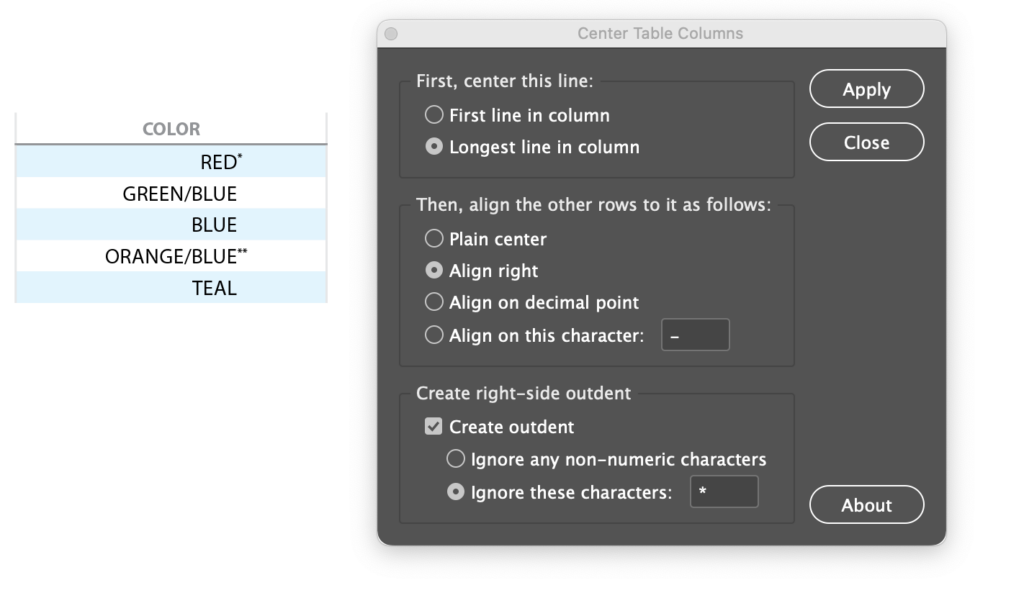
In this example, the Create Outdent feature is used to “hang” the asterisk characters to the right.
To completely clear the effects produced by the Center Table Columns script, select the area of the table you wish to clear, and then either run the script and choose the Plain Center option, or, in the Paragraph panel enter a value of zero for the right indent.
Undo
Every operation of the script is completely undo-able. Because of the “non-modal” nature of the dialog box that is necessary to make the box “sticky” on the screen, you will usually need to click away from the dialog box before the undo keyboard shortcut will function properly.
Leave a Comment