
Using Translate with DeepL
Introduction
Translate for InDesign is a ground-breaking add-on that makes it possible to translate all or part of an InDesign document from virtually any language to many other languages inside InDesign, without the need for third-party software.
The language pairs supported are those supported by DeepL, and the translation itself is performed by DeepL’s advanced machine translation engine.
DeepL is currently considered best in class for machine translations. Although it offers fewer language pairs than Google Translate, for those language pairs that it supports, the results are surprisingly good. The full current list of language pairs supported by DeepL is here: https://www.deepl.com/docs-api/translating-text/request/
(As of 3 July 2022, the languages available are English, Spanish, French, Japanese, Bulgarian, Chinese, Czech, Danish, Dutch, Estonian, Finnish, German, Greek, Hungarian, Indonesian, Italian, Latvian, Lithuanian, Polish, Portuguese, Romanian, Russian, Slovak, Slovenian, Swedish, and Turkish.)
Of course, a machine translation cannot yet compare to a human translation. In many cases, post-editing will be necessary.
Nevertheless, where quantity or speed (and especially where quantity and speed) are necessary, there is no practical alternative to machine translation.
Even in cases where post-editing will be done on the resultant translation, the benefits of having a fully translated InDesign document that maintains the original paragraph and character styles of the original text, that strictly maintains the formatting of the current layout, and that does not require exporting the file to an intermediary format but is simply done in place without the use of external translating applications cannot be overstated.
After translating an InDesign document with Translate, any editor familiar with the target language (and somewhat familiar with the source language) can quickly switch between the original and translated documents and fix up the machine translation, where necessary, directly in InDesign. Likewise, if an editor is familiar with InCopy they can make the changes directly in InCopy.
Custom Dictionary: Translate also allows for the supply of a custom translation dictionary for each target language. Trademarks, technical words and phrases, and even website addresses for each locale and language can be added to the translation dictionary, ensuring that all words and phrases DeepL is likely to mis-translate will be correctly and consistently rendered.
Custom Glossary: For some common language pairs, DeepL allows the use of a custom glossary, and Translate takes advantage of this. The different between a glossary and a dictionary (in this context) is that a dictionary provides a one-to-one substitution of words. For example, you would need an extra entry for plural (dog = chien (Fr.), dogs = chiens).
A glossary is more advanced. It instructs the computer to translate all instances of one word, in all its forms (singular, plural, all conjugations, etc.), into a different word. For instance, if, in your document, the word run actually means processed (he ran the program) rather than the physical activity of running, a single glossary entry of “run” will ensure that all instances of that word in the target language will be translated into the equivalent of “processed”, and this would include run, runs, ran, etc. So a glossary is a powerful translation tool.
Note, however, that DeepL makes glossaries available only for a handful of language pairs. (As of 3 July, 2022, these are: English–Japanese, Japanese–English, French–German, German–French, English–German, German–English, English–Spanish, Spanish–English, English–French, French–English.)
Translate is easy to use and probably does not actually need a full User Guide – except for instructions relating to the use of the custom translation dictionary. Nevertheless, this brief guide will go over the main points, and explain:
- How to buy an initial translation key.
- How to buy extra credit for an existing key.
- How to set the various options in the main window…
- …and in the Account window.
- How to create and use the custom translation dictionary, and
- How to create and use the custom glossary function.
0. Installation
Need help installing the Translate add-on? It’s installed like a regular InDesign script. The best help page for this that I know of is still Dan Rodney’s. Here’s the link: https://www.danrodney.com/scripts/directions-installingscripts.html
1. How to Buy an Initial Translation Key
Translate uses a pay-as-you-go system. The charge is per character translated (including spaces), and part of this goes to cover DeepL’s charge to us. (Although a free tier is available for web users, for access to their API, which we need to make Translate function, DeepL does charge us a per-character fee.)
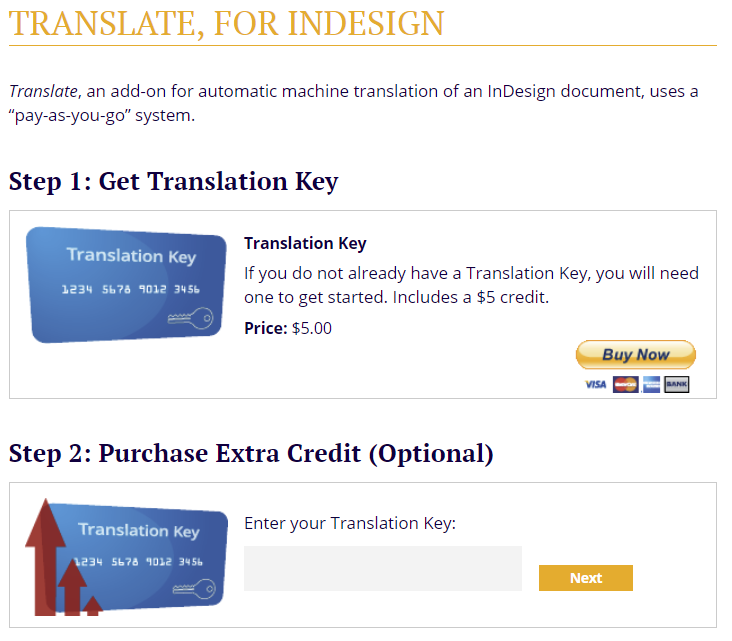
To buy an initial translation key, navigate to the main product page: https://www.id-extras.com/products/translate. Click on “Buy Now” to purchase a new key. The initial charge is $5 USD. This fee includes credit for translating 100,000 characters exactly (roughly 14,000 words).
After completing the purchase, you will receive an email containing a link to download Translate and containing your unique 16-digit translation key.
Download and install Translate as you would any InDesign script. If you are not familiar with this procedure (it’s just a question of copying the unzipped, downloaded file to the correct folder on your computer’s harddrive) here’s a great resource that explains the process for all versions and operating systems: https://www.danrodney.com/scripts/directions-installingscripts.html.
In InDesign, launch Translate by double-clicking on it in InDesign’s Scripts panel. If you are using the Id-Extras menu, you can also launch Translate from there. (For more details on how to use the Id-Extras menu, see here: https://www.id-extras.com/the-new-id-extras-menu.)
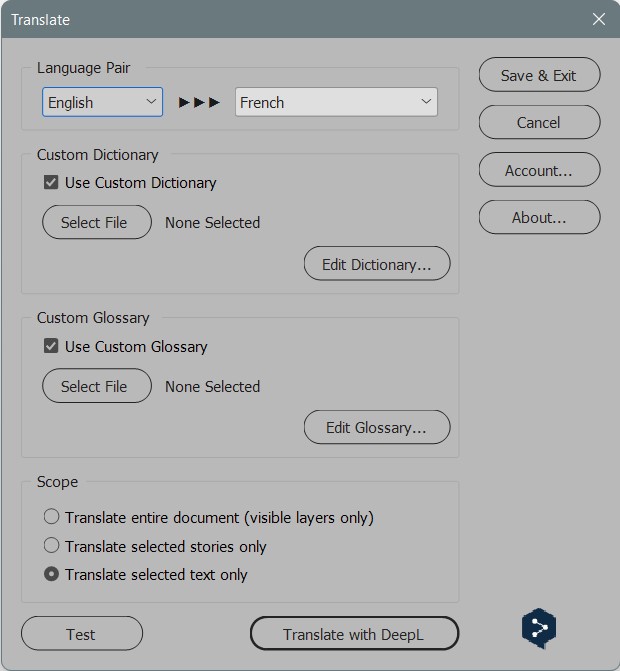
At this stage, the latest version of Translate will be downloaded, and after a few moments you should see the main Translate window:
Since this is the first time you are using Translate, you will need to enter the translation key you received. To do so, click on the Account button. The Account window will open:
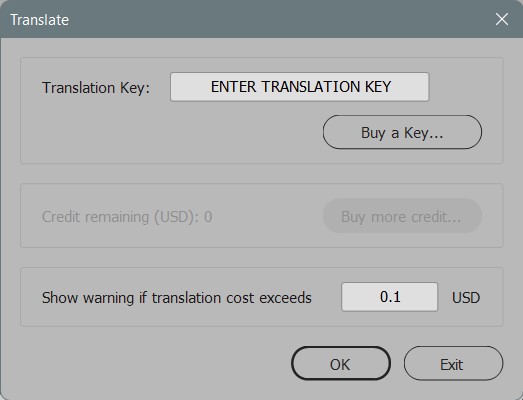
Enter your 16-digit translation key (no need to enter the hyphens – they will be added automatically) and click OK.
If you have entered the number correctly, you should be taken back to the main window. If not, an error message will be displayed. In that case, please check that you have entered your translation key correctly and try again.
Since this is a brand new key, you now have a $5, 100,000 character credit. At any stage, you may confirm your translation key balance by clicking on Account. The credit remaining is displayed in the middle panel.
2. How to Buy Extra Credit for an Existing Key
If at any stage you need to top up your translation credit, open the Account window and click on the “Buy more credit” button. This will send you back to the Id-Extras website, where more credit may be purchased. You can also go there directly by clicking on this link: https://www.id-extras.com/translate-purchase.
Since you already have a translation key, ignore Step 1.
In Step 2, enter your 16-digit translation key and click on the “Next” button.
If you have entered your translation key correctly, you will see the following. Otherwise, an error message will be displayed. Check the key and try again.

Enter the amount of credit (in USD) that you would like to purchase. The number of characters this provides is shown to the right and updates automatically to match the sum entered.
In the example above, a $70 credit has been entered, and this will provide an additional 1,400,000 characters, which is roughly equal to 200,000 words in English or some 500 pages of a book. (These are rough estimates only.)
Click on the “Buy Now” button to complete the purchase.
Once the purchase is complete, you may go back to InDesign. Run Translate (if it is not already opened) and click on the Account button to open the Account window. The balance under Credit Remaining should reflect the purchase you have just made.
3. Understanding the Options in the Main Translate Window
Open the InDesign document which you would like translated and launch Translate. You will see the following window. In this section of the Guide, each of the available options will be explained.

(1) Language Pair Dropdowns
From the dropdown menu on the left, select the current, source language of the open InDesign document. Translate does not attempt to automatically identify the document’s language, so it must be specified here.
From the dropdown on the right, select the target language, that is, the language that you would like to translate the document into.
DeepL regularly adds new languages to its list of supported languages. If any new languages are available, they will automatically be listed in these dropdowns. It may take 24 hours from the time DeepL updates their website for new languages to appear here.
(2) Use Custom Dictionary Checkbox
Check this option if you wish to use a custom dictionary. A “dictionary” in this context means a simple word-substitution table. The custom dictionary must be provided as an Excel file. See below, Section 5, for more details.
Custom dictionaries can be used whatever language pair is selected.
(3) Select File
Click on this button to select the Excel file you wish to use for your custom dictionary. For more details on how to prepare the Excel file for Translate, see below in Section 5.
(4) Edit Dictionary…
This button will open the currently selected dictionary in Excel.
(5) Use Custom Glossary Checkbox
Check this option if you wish to use a custom glossary. A “glossary” in this context means more than just a simple word-substitution table. It is a table of key words and terminology in the source language, together with their approved translation in the target language. DeepL uses AI to convert the terms in the custom glossary into the correct form in the target language with regards gender, number, conjugation, and so on. The custom glossary must be provided as an Excel file. See below, Section 6, for more details.
Custom glossaries are currently available only for a select number of language pairs. The currently available (June 2022) language pairs are English–German, German–English, English–French, French–English, English–Spanish, Spanish–English, English–Japanese, Japanese–English, German–French and French–German only. The up-to-date list can be found on the DeepL website, here: https://www.deepl.com/docs-api/managing-glossaries/
Hovering over this checkbox with the mouse will display the currently available glossary pairs.
If the glossary function is not available for the language pair selected in the dropdowns on top, this option will be greyed out and unavailable.
(3) Select File
Click on this button to select the Excel file you wish to use for your custom glossary. For more details on how to prepare the Excel file for Translate, see below in Section 5.
(4) Edit Glossary…
This button will open the currently selected glossary in Excel.
(8) Scope
Select whether you would like to translate the entire document, the selected stories, or only the selected text. If you launch Translate without first selecting anything, only the “entire document” option will be available.
(9) The Test Button
Once the document is sent to DeepL for translation, a charge is incurred. But sometimes your document may not be set up as expected, or one of the Translate options may be wrong. In such a case you would need to retranslate the document, effectively paying twice for the same translation.
For this reason, it is recommended to do a test run first. Clicking on Test will run a fake translation on the selected text or the entire document without incurring a cost.
“Fake translation” means that the text will be replaced with target-language-aware gibberish based on InDesign’s Lorem Ipsum text. So the result will not be a meaningful translation. But other options will be respected. And, of course, there is no charge for this, so if anything seems wrong, you will have an opportunity of putting it right before submitting the document to DeepL for a proper translation.
The test function is particularly useful for checking that the custom dictionary is working properly. However, it ignores the custom glossary altogether.
Running a test translation will convert the targeted text to gibberish that matches the target language. Eight alphabets are supported: Roman (for all European languages), Cyrillic, Greek, Hebrew, Arabic, Japanese, Chinese and Korean.
TIP: To replace all or some of the text in your InDesign document with Lorem Ipsum text while preserving the formatting and layout, use the Test feature!
(10) Translate with DeepL
This will send the text to DeepL for translation. The number of characters will be counted (including spaces) and the appropriate sum deducted from your account.
Please note that we are not able to offer refunds if anything goes wrong, even if Translate itself is at fault. It is therefore recommended to translate smaller quantities of text each time to reduce your risk exposure. If you send a 1000-page document to be translated and Translate crashes on page 999, you will have lost $70 that we unfortunately cannot refund in any case. If, instead, you send 10 pages at a time, the loss is only $0.70.
Although the quality of DeepL translations is excellent, you solely are responsible to verify the final translated result, since funny, offensive, inaccurate or even dangerous mistranslations can be inadvertently introduced into your texts when using machine translation-based applications. Please read the Disclaimers at the end of this Guide.
Sending a large amount of text for translation can take several minutes.
If you have selected the option to display a warning if the translation costs exceeds a certain sum, a warning will be displayed showing the expected cost of the translation.
(11) Save and Exit
Saves your settings and exits Translate. Settings will be remembered next time Translate is run.
(12) Cancel
Exits Translate without saving any modified settings.
(13) Account
Opens the Account window. See below for more information.
(14) About
Displays version details and includes links to this page, the End-User License Agreement, and more.
The About dialog box also includes a checkbox to add Translate to the Id-Extras menu (https://www.id-extras.com/the-new-id-extras-menu).
4. The Account Window
Clicking on the Account button in the main window (see (13) above), will open the following window:

(1) The Translation Key field is where you enter the translation key that you have purchased.
Although the key you are given is unique, multiple users may use the same key if you share it with them. In that case, all translation costs will be deducted from your account.
Important: Please keep your key private unless you intend to share it. Anyone with access to the key will be able to use it with their copy of Translate.
If you wish to purchase an additional key, click on the Buy a Key button, which will open your browser at this page: https://www.id-extras.com/products/translate.
(2) Under “Credit remaining” you can check how much credit remains for this translation key. In the screenshot above, the user has just over 67 cents (approximately 14,000 characters) left.
The sum displayed is always in US dollars.
Click on “Buy more credit” to top up your translation key with extra credit, or purchase more here: https://www.id-extras.com/translate-purchase.
(3) To avoid inadvertently spending a lot of money on a translation, you can tell Translate to display a warning if the cost of the translation will exceed a certain amount. In the text field here, type the amount above which you would want to display a warning.
5. Custom Translation Dictionary
There are many reasons you might want to supply your own translation for certain words and phrases rather than relying on a machine translation.
Translate makes this possible through its custom translation dictionary feature which is easy to use and reuse and allows the use of separate word lists for each target language.
The basic idea is to create an Excel file where the first cell in each column is the name of one of the languages, exactly as it appears in either of the two language dropdown lists at the top of the Translate window (see the screenshot above).
The first row can include all or some of the languages, as needed.
Important Note: Notice that some language varieties only appear in the second dropdown. For instance, you can choose English as a source language, but in the target language dropdown there are two varieties of English: English (British) and English (American). So in your Excel file, if you’re planning to translate into English (British), the column label at the top must read “English (British)”.
When you download Translate, the download package includes a sample Dictionary file with most of the language headers already typed in in the first row. (Add any languages you need that might be missing.)
You can now fill in the Excel file with the words needed.
Example: Below is a screenshot of a sample Excel dictionary file. This company has a product called “Mr Muscle”, and they do not want the product name to be translated, so they have listed the same name in all target languages. “Mr Muscle” will stay “Mr Muscle” if the target language selected is Finnish, French, German, Hungarian or Italian. Since the other columns are blank, “Mr Muscle” will be translated if any of the other target languages are selected.
Likewise, they have provided the website addresses of the localized websites, so when an English document is translated, the URL of the English website will be switched to the correct URL for that target language.

The custom dictionary file can be as long as needed. And it should be clear that a single custom dictionary file should normally be sufficient for all languages. (Of course, you may choose different dictionary files for different translation projects if that is more convenient or more manageable.)
Notes: (1) Entries are case sensitive. (2) There must be a separate entry for each variant of the word: plurals, possessives, etc.
To use the Excel dictionary file you have created, select the “Use Custom Dictionary” checkbox. Then click on the “Select File” button and navigate to your Excel dictionary file. This file will now be used, and any instance of one of the words in the dictionary file appearing in the source text will be substituted with the appropriate target term.
Note: In previous versions of Translate, it was necessary to prepare the InDesign file for the custom dictionary to work properly. This is no longer necessary. All words in the InDesign document that are found in the dictionary will be translated according to their entries in the dictionary.
6. Custom Translation Glossary
What is the purpose of a translation glossary?
What Is a Translation Glossary? (languageline.com) answers as follows: “The glossary is a tool or document that helps alleviate challenges with consistency. It encompasses your vital terminology in your source language as well as approved translations in all target languages. A translation glossary is an essential component in making sure that all translated work is up to your quality standards. The translation glossary ensures that translators use a defined term correctly every time it shows up, in any language.”
The difference between a glossary and dictionary (in the context of machine translation) is that the translation dictionary provides a simple word lookup table. A word or phrase, website or number is substituted with another word or phrase or number.
This means, though, that every variation of that word must be listed in the dictionary. Singular and plural forms, masculine and feminine forms, and all conjugations of the same word must be listed.
A glossary is far more flexible. Rather than a simple substitution, a glossary is an instruction to the computer to use a particular word or phrase in the target language whenever a particular word or phrase appears in the source language. The computer software will then ensure that the correct form of the word or phrase is used.
DeepL allows the use of glossaries for (currently) a limited number of language pairs.
To see a list of the language pairs that support a custom translation glossary, hover over the “Use Custom Glossary” checkbox with your mouse. A popup will appear show the glossary pairs available.
In Translate, if a language pair is selected that allows the use of a glossary, the option becomes available. If a language pair that does not support glossaries is selected, the option to upload a glossary is greyed out and unavailable.
The glossary must be provided as an Excel file.
Prepare the Excel file exactly as described in Section 5, “Custom Translation Dictionary”, above.
To use the Excel glossary file you have created, select the “Use Custom Glossary” checkbox. Then click on the “Select File” button and navigate to your Excel glossary file. This file will now be used, and any instance of one of the words or phrases in the glossary file appearing in the source text will be substituted with the appropriate target term.
7. How to Mark Text to Not Be Translated
There may be passages in your document that should not be translated or modified in any way. Examples may include lines of computer code, or source material that must be kept in the original language.
You can tell Translate to skip a word, sentence, or longer passages of text by surrounding the text with double brackets: Place [[ before the text, and ]] after it.
For instance, [[in this sentence]], the phrase “in this sentence” would not be translated or modified because it is surrounded by double brackets.
Note: Unlike previous versions of Translate, with the current version you can freely mark multiple paragraphs of text, with varied formatting, to be ignored by placing a single pair of double brackets at the beginning and end of the entire passage of text.
Note: Be aware that if your text contains double brackets already (this might be the case with computer code or algebraic equations), you will need to temporarily change them to something else.
Note: Translate will automatically avoid modifying hyperlinks in a document, provided they are marked as hyperlinks, that is, they appear in InDesign’s Hyperlinks panel. To convert all URLs in a document to hyperlinks, use InDesign’s built-in “Convert to Hyperlink” function (Type > Hyperlinks & Cross-references > Convert URLs to Hyperlinks), or, for a more robust and fully featured solution, use Id-Extra’s Hyperlink Pro add-on.
8. Legal Disclaimers
By using Translate, you agree both to our standard EULA, available here, and also to the following Terms and Conditions:
THIS SERVICE MAY CONTAIN TRANSLATIONS POWERED BY DEEPL. DEEPL DISCLAIMS ALL WARRANTIES RELATED TO THE TRANSLATIONS, EXPRESS OR IMPLIED, INCLUDING ANY WARRANTIES OF ACCURACY, RELIABILITY, AND ANY IMPLIED WARRANTIES OF MERCHANTABILITY, FITNESS FOR A PARTICULAR PURPOSE AND NONINFRINGEMENT.
Translate, by Bookraft LLC, translates InDesign documents for your convenience using translation software powered by DeepL.com. Reasonable efforts have been made to provide an accurate translation, however, no automated translation is perfect nor is it intended to replace human translators. Translations are provided as a service to users of the Bookraft LLC Translate add-on, and are provided “as is.” No warranty of any kind, either expressed or implied, is made as to the accuracy, reliability, or correctness of any translations made from any language into any other language. Some content (such as images, videos, etc.) may not be accurately translated due to the limitations of the translation software.
Bookraft LLC and the Id-Extras.com website are not affiliated with DeepL in any way.
9. Conclusion
Translate for InDesign brings DeepL’s neural machine translation model into InDesign, allowing for quick, and surprisingly accurate, machine translations to be made with minimum effort and maximum speed. The convenience of being able to machine-translate an InDesign document and maintain all existing formatting and styling without needing to export the file to IDML or into any other translation system (which is both a lossy process and requires expensive translating software to be available) is what makes Id-Extras’s Translate add-on for InDesign a unique and compelling solution.
Questions and Comments
We’d love to hear your feedback and will do our best to answer any questions. Please feel free to post your thought below.
Dia
February 28, 2019 8:15 pmQuestions:
(1) Can it work with the following Chinese fonts:
Yuanti TC
Yuanti SC
華康圓體W9(P)-GB5, 華康圓體W7(P)-GB5, 華康圓體W5(P)-GB5
(2) Can it translate from Traditional Chinese to Simplified Chinese directly like in Google Translation?
Ariel
February 28, 2019 8:32 pmHi,
(1) I’m not familiar with Chinese fonts, unfortunately, so I can’t give a firm answer. However, if InDesign supports those fonts, and if cutting and pasting Chinese text written in those font into the only Google Translate works, I see no reason why it shouldn’t work with our Translate add-on.
(2) Yes, those options are available.
Thanks,
Ariel
Acharya Hariishananda Avadhuta
April 11, 2020 9:46 pmThere is a problem with the font while translating in Hindi. Please let me know which font is supported for Hindi Translation.
Ariel
April 16, 2020 2:59 pmHi,
Any font that supports Hindi should be fine. I’m not familiar with Hindi, so I can’t advise on specifics, unfortunately.
Thanks,
Ariel
Karel
October 24, 2022 3:39 pmHi, I have used your script for Chinese-Traditional to Chinese Simplified Google Translation in the past. However this time halfway through the translation process I am getting this message…
“Mismatch between theText and gParaEnd”
What does this mean pls?
K
Ariel
October 24, 2022 5:15 pmHi Karel,
Thanks for getting in touch about your problems with the Google Translate add-on.
If you’re translating into Simplified Chinese, I would recommend using our latest Translate add-on, which uses DeepL translation rather than Google.
It is much more reliable, and the translation quality is better as well.
I’ve sent you a copy of the new add-on by email. (If anyone else reading this would like a copy, please get in touch as well.)
You can use the same Translation Key as you’ve been using for Google Translate.
You can have both add-ons installed at the same time.
Our development efforts are going into the DeepL Translate add-on at this point, so my recommendation is that the only time you should be using the Google Translate add-on is if DeepL does not offer the language pairs you need.
I hope that helps, and I’d be very interested to hear how you get on with the DeepL Translate add-on!
Ariel
Simon
May 11, 2023 10:24 pm1. Will the words that are in the Custom Translation Dictionary and Custom Translation Glossary stil sent to DeepL and count as translated and will be charged?
Ariel
May 12, 2023 12:33 amHi Simon,
No, there is no extra charge for using a custom translation dictionary or custom glossary.
Ariel
Ernie
July 26, 2023 12:06 pmDeepL offers the choice between a formal and a less formal tone. The script appears to default to formal with no way of changing it. Could an option be added? It’s &formality=more/less in the API request.
Ariel
July 26, 2023 3:25 pmHi Ernie,
You’re correct that it defaults to “formal”. I will definitely consider adding an option in the next update.
Thanks,
Ariel
Ernie
July 31, 2023 11:35 amThanks, that would make it a lot more usable for me. It makes a big difference in some languages.
Bens
September 19, 2023 9:43 amHi Ariel.
Thanks for an excellent product. I’m running v. 3.1.4 and it seems that this is several months old. We have run a number of major translations and there is a noticeable difference between this and the online version of DeepL. Is the latest API implemented in the plug-in? Can you tell us when there will be an update?
Ariel
September 19, 2023 11:55 amHi Bens,
The current API version is version 2 (and has been for a while). This is the version that Translate works with.
Translate doesn’t currently support levels of formality (hoping to add that soon).
Can you post an example of a sentence or two that is being translated differently with Translate vs. online?
Are you sure this is not the result of a different formality setting, or perhaps your use of a custom glossary?
DeepL can be fairly responsive to feedback, so if I had some text that clearly shows the difference, I could file a bug report with them.
Ariel
Manish Jain
March 30, 2024 2:39 pmHow to use custom dictionary for Google translation. We wish to translate from English to Hindi. This pair is not supported by DeepL. When we try to select the file, it opens the same not select it. Also, there is no checkbox. Also mention in which format we need to insert the file for Google Translate. Excel or txt
Ariel
April 3, 2024 3:10 amHi Manish,
The option to use a custom dictionary or glossary is currently only available with the DeepL Transate add-on, not with the Google one.
Ariel