Using “FormMagic”
1. Introduction
This short guide will show you how to get the most out of FormMagic.
Note: This guide is also fully applicable to FormMaker.
Note: To learn about all the additional features that FormMaker offers, visit the FormMaker Help page, here: https://www.id-extras.com/help/formmaker-help/. However, this guide is also essential reading for FormMaker users, as the information here is not covered in the dedicated FormMaker help page.
FormMagic consists of an InDesign add-on and an Acrobat script. Together, they make it easy to create fully styled interactive PDF forms in InDesign.
InDesign natively (that is, without the use of FormMagic) allows the user to set only the size of the text displayed when the end-user fills in an interactive PDF form in Acrobat.
FormMagic greatly extends the InDesign user’s choices in styling form fields. With FormMagic, you can apply the following properties to form fields directly in InDesign, and they will carry over to the form fields in your interactive PDF form, so the end-user will see their text styled accordingly as they fill out the form in Adobe Acrobat Reader:
- Font. Without FormMagic, it was impossible until recently, with InDesign alone, to specify the font to be used in a form field. And even now that InDesign does allow specifying a font for fields, the font is not embedded in the PDF form. This means that if end users do not have installed on their computer the font chosen by the designer of the form, it will not work! They will see the default Times Roman font instead. But with FormMagic, the font the designer has chosen for form fields is embedded into the PDF itself, so that all end users will see the right font, even if they do not have it installed on their computer!
- Default text. Without FormMagic, it is impossible, with InDesign alone, to include default text in a form field. All form fields will open in Acrobat Reader as blank fields. With FormMagic you can supply the default text that should appear in each form field in the PDF.
- Color. With FormMagic you can set the color of the form field text.
- Alignment. FormMagic allows you to set the alignment of form fields (left, center, right).
- Strikethough and underline.
- Superscript and subscript.
- Rich text. If you are using default, placeholder text in your form fields, you can format this text with a mixture of any of the above, creating richly-styled default text.
- Field rotation. Acrobat has four rotation options for form fields (0, 90, 180 and 270 degrees). Until now, it was not possible to rotate fields with FormMagic. But with the 2.0.0 update this is now possible. Simply rotate the fields in InDesign, and FormMagic will rotate the fields in your PDF form to the nearest available option.
The above properties modify the styling of the font that the user sees when filling in an interactive PDF form. But another important feature of FormMagic is the ability to designate form fields as “combs” directly inside InDesign.
- Combs. Comb fields are fields that look like the following. That is, a field divided into individual cells, allowing the user to input one character per cell.

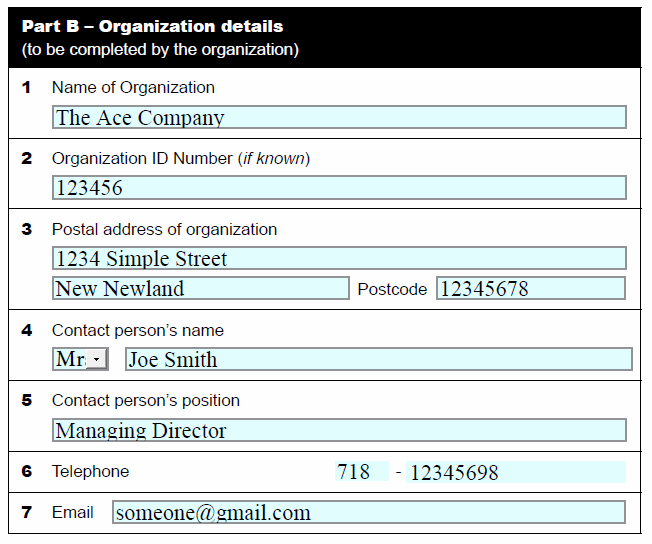
In short, look at the following simple form. This form has been created natively in InDesign without FormMagic. Note that all text uses the default Times font, is left-aligned, 12pt in size, black, and the Postcode field is not a comb. Also note that the text inside all the form fields has been typed in manually in Acrobat. This is the best you can do with a form designed with InDesign without the benefit of FormMagic.
Compare the above to the same form, designed in InDesign, but with the benefit of FormMagic:
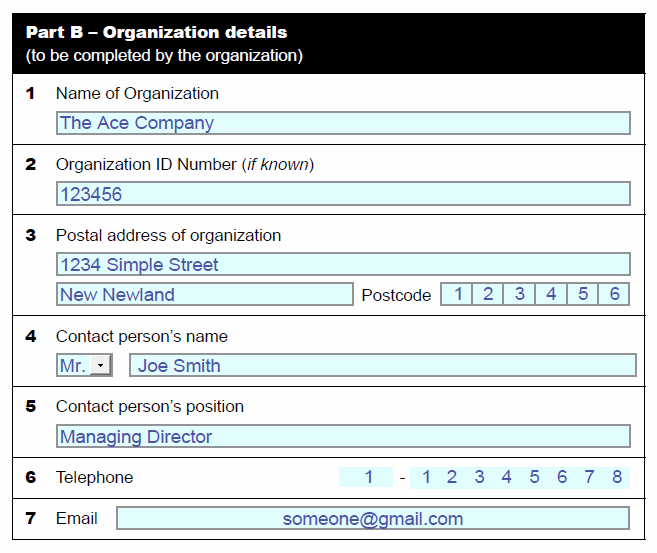
Note that a blue sans-serif font is used rather than the default black Times Roman font. The email field at the bottom is centered. The postcode field is set as a comb field. And the text that appears in the forms fields can be supplied in InDesign.
1.1 Types of Form Fields
FormMagic can modify the properties of all form fields containing text, namely combo boxes, list boxes, and of course text fields.
Additionally, FormMaker allows attaching Javascript scripts not only to these types, but also to buttons and checkboxes.
1.2 FormMagic versus FormMaker
What is the difference between FormMagic and FormMaker?
FormMaker includes all of FormMagic‘s features, but, additionally, allows for the inclusion of validation, calculation, and formatting scripts in InDesign.
FormMaker also includes an almost complete replica of Acrobat’s Properties and Options panel, and includes many features available in Acrobat but not available in natively in InDesign or with FormMagic. See a complete product comparison chart here.
In the following guide, all features described are applicable both to FormMagic and FormMaker, unless it is explicitly stated that a certain feature (namely, the addition of form scripts) is applicable to FormMaker only.
For help with FormMaker-specific issues, refer to the FormMaker User Guide.
2. Installation
Unlike most Id-Extras.com add-ons, FormMagic consists of two separate files: one for InDesign, and one for Acrobat.
After downloading and extracting (unzipping) FormMagic, you will find the following 2 script files:

The file called “FormMagic1.7.5.Pro”, which is a .jsxbin file, is the InDesign file (the version number – 1.7.5 in this case – can of course be different). As usual for any InDesign script, this file must be copied to the InDesign Scripts Panel folder on your hardrive (see “How to install an InDesign script or add-on”).
The file ending in .js, the one that has the word “Acrobat” in the file name (in the example, the name of this file is FormMagicAcrobat1.7.Min.js, though the version number might be different for you) must be copied to the Acrobat Javascripts folder on your hardrive. To find this folder follow the instructions below relevant to your operating system:
2.1 Finding the Acrobat Javascripts folder on Windows
On a Windows 64-bit machine with Acrobat XI, this folder is here (presuming your main harddrive is called C:):
C:\Program Files (x86)\Adobe\Acrobat 11.0\Acrobat\Javascripts
If you’re using Acrobat DC, change “Acrobat 11.0” in the above path to “Acrobat DC”, so it looks like this:
C:\Program Files (x86)\Adobe\Acrobat DC\Acrobat\Javascripts
2.2 Finding the Acrobat Javascripts folder on Mac
On a Mac computer, to find the Javascripts folder, do the following:
- Open Finder and click on Applications.
- Locate and click on “Adobe Acrobat DC” (or “Adobe Acrobat XI” if you’re using the earlier version).
- Right-click (or ctrl-click) on “Adobe Acrobat.app” and select “Show Package Contents” from the context menu that appears.
- Click on the “Contents” folder to open it.
- Click on the “Resources” folder to open it.
- Inside the Resources folder, you should be able to find a folder called “Javascripts”, and into this you should copy the Acrobat file.
In short: On a Mac, copy the Acrobat component of FormMagic here: /Macintosh HD/Applications/Adobe Acrobat XI Pro/Adobe Acrobat Pro.app/Contents/Resources/JavaScripts/
2.3 If all is well…
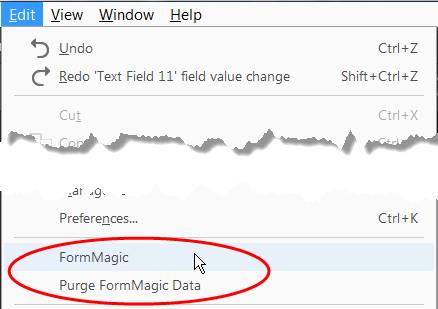
On both Mac and Windows, if you have copied the Acrobat file to the right place on your harddrive, when you launch Acrobat (Acrobat must be restarted for this to work) two new menu items should appear at the bottom of the Edit menu: “FormMagic” and “Purge FormMagic Data”. It should look like this:
Important! If you are using the latest version of Acrobat with the new UI (Acrobat 2023, at the time of writing), you must disable the new UI. This is easy to do and is reversible (i.e. you can always go back to the new UI if you like). On Windows computers, click the hamburger menu (3 lines) at the upper-left corner and choose “Disable new Acrobat”. On Mac computers, from the View menu at the top, select “Disable new Acrobat.”
3. Using FormMagic to Add Formatting to Interactive Form Fields: The Basic Idea
To apply formatting to form fields with FormMagic:
1. Create your form, adding as many text fields, combo boxes, and list boxes as needed.
IMPORTANT! (Many people are confused by this): Use InDesign text frames for your form fields. Do not use rectangles! Text frames in InDesign allow you to type inside them, so you can add default text, apply styling and color, etc. Rectangles are just shapes. If you add a rectangle to your page in InDesign, you will not be able to apply text formatting to it! (However, with FormMaker you can use the UI to apply formatting to fields even if they are made out of rectangles and not text frames.)
2. Add some default text to these fields and format the text freely (the Introduction, above, lists the formatting that will carry through to Acrobat with FormMagic). You can also apply paragraph or character styles to the text.
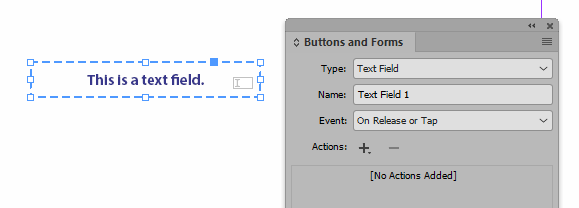
In the following example, the font selected is Myriad Pro Bold. It has been colored blue, and is centered inside the text frame.
3. Run FormMagic by double-clicking on it in InDesign’s scripts palette. (If you have selected this option, you can also run FormMagic from the special Id-Extras menu that appears in InDesign’s menu bar.)
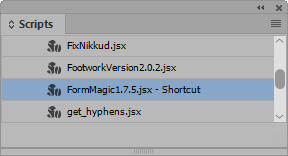
A message will be displayed saying that the FormMagic data has been stored. Click OK:

4. Export the document from InDesign as usual for an interactive PDF form (File > Export, and choose “Adobe PDF (Interactive)”.
5. The form will open in Acrobat (or open it manually if it does not open automatically). Initially, it will be blank:

Now, click on the new “FormMagic” menu item that appears at the bottom of the Edit menu in Acrobat (see the screenshot above, in the “Installation” section). The form field will magically turn into this:

The default text has been restored. The font chosen in InDesign has been applied to the text. The color has been restored, and so has the alignment (centered)! With one click, all form fields in your PDF – however many pages long it is – will be fully formatted according to formatting applied in InDesign.
Not only text fields, but also combo boxes…
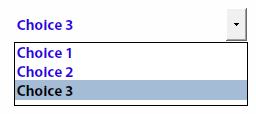
… and list boxes

… can be formatted with FormMagic.
Note: The properties available for list boxes and combo boxes are font size, color, and font only (but not alignment or default text).
3.1 No default text? No problem!
The above example presumes that you want default placeholder text to appear in your form field in Acrobat. But what if you do not need placeholder text? What if you want the user to see a blank field initially. When they start typing in the field in Acrobat, that’s when the chosen font, colour, alignment, etc. should become apparent – but not before.
It’s easy to do this with FormMagic. In fact, the method is identical to that described in the previous section. But instead of formatting the text in the field, you format the insertion point in the field. Let me explain.
Every text frame and form field in InDesign has at least one insertion point, even if there is no text in that frame or field. The insertion point is where you see the text cursor blinking when you’re in text mode ready to type something – as can be seen in the following screenshot (the red arrow indicates the insertion point).

As you probably know, if you want the text that you are about to type to appear in a particular font, with a particular alignment, size, colour and so on, you can choose all these properties before beginning to type. Once you have set the desired properties, any text you now type will be styled accordingly.
Likewise, even before typing any text, you can apply a paragraph style or character style to the insertion point, and any text typed thereafter will acquire the selected the styles and be formatted accordingly.
For example, in the above screenshot, any text typed will appear as Myriad Pro Bold at 12pt.
If FormMagic does not find any default text in a form field, it will read and store the properties of the invisible insertion point. Then, when the end-user starts filling in the form in Acrobat, all text will appear styled in the same way as the insertion point in the field was styled in InDesign.
So, to set these properties without default text, make sure your text cursor is flashing inside a form field in InDesign and apply the required formatting to the insertion point, or select a paragraph or character style. Once the form has been styled as needed in InDesign, apply steps 3–5 above.
Note: Recent versions of InDesign allow you to set the font of a text field in the Buttons and Forms panel. Don’t use this with FormMagic! FormMagic will ignore your settings there and indeed override them. The only way to set the font with FormMagic is by going into the text frame and setting the font there – the regular way of setting a font in InDesign. (You can use paragraph or character styles as well, of course, as usual.)
3.2 The magic font size: 12.345pt!
There is a setting in Acrobat that allows the size of the text in text fields to grow or shrink automatically to accommodate the text the user has typed (you set the font size in Acrobat to “auto”.)
To apply the “auto” size to text using FormMagic, set its size in InDesign to the magic number 12.345 (easy to remember: 1 2 3 4 5). When text is set to be exactly 12.345pt in InDesign, FormMagic will set the text size in Acrobat to “auto,” so the text will expand or contract to fit the available space in the field.
(And, yes, this means that you cannot set the size of text to be 12.345 if you’re using FormMagic (because this will switch on “auto” mode in Acrobat). But you can set it to be 12.344 or 12.346!)
4. How to Create “Comb” Fields
Comb fields are forms fields that are divided into separate cells or boxes. The end-user is required to enter one character or digit per cell. They are commonly used wherever a fixed number of characters is expected, and look like this:

Acrobat lets you turn a regular text field into a “comb” field and set how many cells there should be. With FormMagic, you can do this in InDesign as well!
(Note: With FormMaker you can simply use the UI to specify that a field should be a comb field, and of how many characters.)
To create a comb field with FormMagic, first create a regular text field:

In the text field, insert a vertical line character, sometimes called a “pipe” (it looks like this: | ). Add as many lines as you want cells in the comb field.
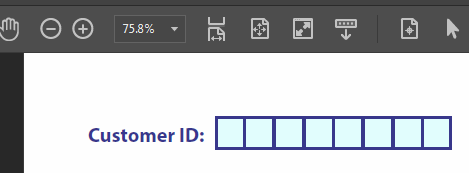
Whenever FormMagic sees such a vertical line in a text field, it will convert that field into a comb field in Acrobat, with as many cells as there are lines.
If you add 8 lines, for example, as in the following screenshot:
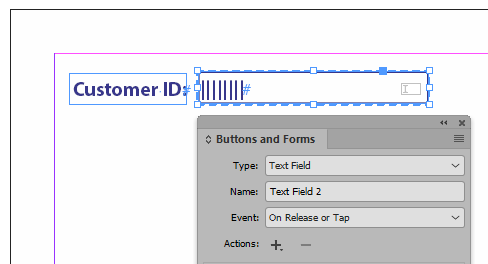
The result will be an 8-celled comb field in Acrobat:
If you add placeholder text in InDesign, as in the following screenshot:
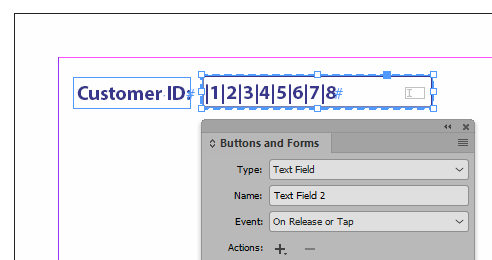
This will carry through to Acrobat as well:

As usual, you can set the font, style, color, alignment, and so on, directly in InDesign, by applying the desired formatting to the placeholder text, or to the insertion point, as described above.
Note: The width and color of the cells in Acrobat is based on the width and color of the stroke given to the text frame in InDesign. Making the stroke thicker in InDesign will make the cell border thicker in Acrobat.
Note: If you want the cells to have no visible border, set the stroke width of the text frame in InDesign to 0.
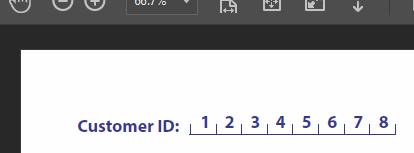
Tip: Acrobat only provides one design for comb fields – the one shown in the screenshots above. If you need a different design, set the stroke width in InDesign to 0, and paste the design you want on top of the text frame in InDesign. The result in Acrobat could be something like this, for example:
5. Rich Text Fields
There are two types of text fields in Acrobat: Plain text fields, and rich text fields.
Plain text fields allow only one type of formatting in the field – a single style (bold, italics, etc.), a single font, a single size, and so on.
Rich text fields allow a mixture of formatting within the same field.
With FormMagic, you can create rich text fields in InDesign that carry over to Acrobat!
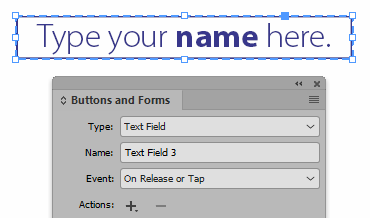
This is done by providing default text styled in at least two different ways. As soon as FormMagic sees that text in a text field has been formatted in different ways, it will create a rich text field in Acrobat.
For example, the following field has text in roman type and bold type. Because these are different types of formatting, the corresponding field created in Acrobat is a rich text field.
InDesign:
Acrobat:

Note: Because it is necessary to have two different types of formatting inside the text field in InDesign, to create a rich text field it is necessary to have some default text (if the frame consisted of a single insertion point only, there could only be a single type of formatting). If you do not want any placeholder text to appear, but you still wish to create a rich text field in Acrobat, consider adding two blank spaces to the text frame in InDesign. Format one space slightly differently from the other space. This way, no default text appears in the form, but the field will be designated as a rich text field.
Note: Some rich text formatting available in Acrobat cannot be set in InDesign with FormMagic. This includes line spacing.
6. FormMagic and Fonts
FormMagic does its best to apply the exact font used in InDesign to the form field in Acrobat. (More about that below.)
And the best part is that usually this font will be fully embedded in the PDF.
This means that anyone who opens the interactive PDF you create with FormMagic will be able to fill in the form and will see the fonts you have selected, even if they do not have those fonts installed on their own system.
Some fonts, though, do not allow such embedding, so it is important to test your PDF form on a computer that definitely does not have those fonts installed to see whether they have been successfully embedded.
6.1 The Exception: Safe Fonts
Despite the above warning, there are a handful of fonts that Acrobat itself (including Adobe Acrobat Reader) makes available to all users filling in forms, even if they do not have those fonts installed on their machines.
These fonts, which are always available, are the following:
- Times Roman (and also Bold, Italic, and BoldItalic)
- Helvetica (and also Bold, Oblique, and BoldOblique)
- Courier (Bold, Oblique, BoldOblique)
- Symbol
- ZapfDingbats
If you use any of the above fonts, you can be sure that the end user will see the form as you intended.
6.2 Font Substitution
Windows users normally do not have all the above fonts installed by default. Although they are available in Acrobat, they are not available in InDesign.
For instance, Windows does not come with Helvetica. However, since Helvetica is a great sans-serif font, and since it often makes good design sense to set the font for a form to be a sans serif, it would be a shame if Windows users had no way of making use of the safe font Helvetica. (Since it is not available to them, they cannot apply Helvetica to the default text in InDesign!)
FormMagic provides a way to work around this limitation, allowing Windows users to take full advantage of Acrobat’s safe fonts. It achieves this through a simple form substitution table. If the user chooses one of the fonts listed in the table below, FormMagic will substitute it with the appropriate Acrobat safe font. In all cases, the subtitution fonts are almost identical to the chosen font – most end users would probably not be able to tell the difference.
The substitution table is as follows:
| Font used in InDesign | Acrobat “safe-font” substitution |
| Times New Roman Regular | Times Regular |
| Times New Roman Bold | Times Bold |
| Times New Roman Italic | Times Italic |
| Times New Roman Bold Italic | Times Bold Italic |
| Arial Regular | Helvetica |
| Arial Bold | Helvetica Bold |
| Arial Italic | Helvetica Oblique |
| Arial Bold Italic | Helvetica Oblique Italic |
| Courier New Regular | Courier |
| Courier New Bold | Courier Bold |
| Courier New Italic | Courier Oblique |
| Courier New Bold Italic | Courier Bold Oblique |
| Symbol (actually, Symbol Monotype) | Symbol |
Note: Although it’s not obvious, a similar substitution occurs for Mac users as well. For instance, if a Mac user selects Helvetica for a text field, the font chosen is the system-wide Helvetica available on Macs. However, in this case too FormMagic will actually tell Acrobat to use its own generic, “safe” version of Helvetica. So although on Mac the names are the same as Acrobat’s safe fonts (so it is not necessary to display a substitution table as I’ve done above for Windows), in fact a font substitution is taking place. This is desirable because it means that if a form is designed with Helvetica, even if that form is used by an end-user on a Windows machine, the font will display properly (using Acrobat’s built-in Helvetica).
Important Note: Font substitution only occurs for plain text fields! If a rich text field is created (see above), no substitution will take place, either on Windows or Mac! Arial will stay Arial, and Helvetica will stay Helvetica and not be substituted with Acrobat’s safe Helvetica!
Note for FormMaker users: You can select any of the Acrobat-safe fonts directly from the FormMaker window in InDesign. Font substitution is therefore no longer needed and has been disabled.
6.3 Bypassing Font Substitution
Sometimes, a designer on a Windows machine will specifically want to use Arial, for example, and not have it substituted with Helvetica.
From version 1.8.0 of FormMagic onwards, it is possible to bypass the default font subtitution by using the user-supplied FontList.txt file. See below for more details.
7. Advanced: Using the FontList.txt File
InDesign and Acrobat have different names for the same font. When you choose a font from a list in either program, the font names are the same, but internally both programs have a different naming system.
Since FormMagic runs in InDesign, it must try to guess the name of the fonts you are using in your form so that Acrobat will recognize them. Luckily, using simple hueristics, the guessing routine works most of the time. So most of the time you can select any font in InDesign and find that the correct fonts is being used in Acrobat as well.
But if you notice that despite using a font in InDesign, all your’re getting in the Acrobat form is Times, you will need to assist FormMagic find the correct name. This feature is available from version 1.8.0. It works as follows:
In the same folder as the InDesign FormMagic.jsxbin file, create a plain text file (with a .txt extension) called “FontList.txt” (without the quotes, obviously).
Type the name InDesign uses internally for the font, then tab, then the name Acrobat uses for the same font and save the file. How to find these internal names will be explained shortly.
Now when you run FormMagic in InDesign, it will first check to see whether FontList.txt exists in the same folder. If it does, instead of guessing the internal font name, it will look it up in the FontList.txt file.
7.1 How to Find the Internal Font Name: InDesign
To find the name InDesign uses for a given font, it is necessary to run the following small script. First, though, open a new document in InDesign, type some text using the font, and select one letter from it. Then run the following script:
prompt("The name of the selected font is:", app.selection[0].appliedFont.postscriptName);
You should see something like this in InDesign:
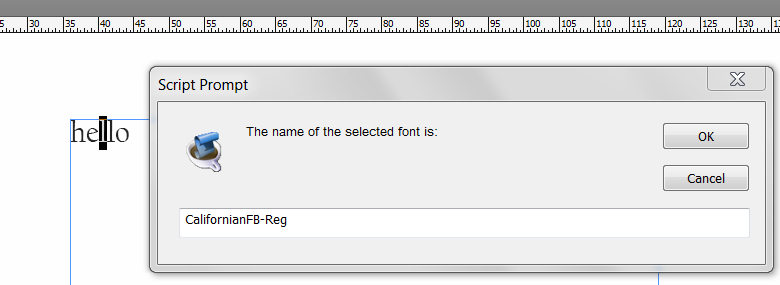
Copy the text that is shown on a new line in the FontList.txt, exactly as it appears. In this case you would copy “CalifornianFB-Reg” (without the quotes) and paste that into FontList.txt.
Press Tab, so that you’re ready to copy the internal Acrobat name of the same font.
7.2 How to Find the Internal Font Name: Acrobat
In the previous step, you created an InDesign file and typed some text into it using the font in question.
For this step, export that simple InDesign document to PDF. A regular PDF is fine; it does not need to be an interactive PDF.
Open the PDF in Acrobat. Go to File > Properties, and click on the Fonts tab. You will see something like this in Acrobat:

Copy the Acrobat font name into the FontList.txt file, after the tab that you typed in the previous step. In this case, you would type “CalifornianFB-Reg”. (Perhaps this is a bad example: The internal font name for this font in InDesign and Acrobat is identical, so there would be no point in adding this font to the FontList.txt file. But sometimes the names are different!)
Save FontList.txt, and close it. FormMagic will refer to this list whenever it tries to guess the correct Acrobat font name.
7.3 How to Prevent Font Substitution
Above, in the section “Font Substitution”, we noted that sometimes you will want to bypass FormMagic‘s automatic font substitution.
To do this, use the steps just described to create an entry in the FontList.txt file. For instance, if you do not want Arial to be substituted for Helvetica, type some text using Arial in InDesign, and follow the steps to create the appropriate line in FontList.txt. This will force FormMagic to use the font in FontList.txt rather than replace it with Helvetica.
8. Further Reading: Creating a Batch Action in Acrobat
Using FormMagic or FormMaker is a 2-step process.
First, FormMagic must be run on the InDesign file. Then, it must be run again in Acrobat on the resulting interactive PDF.
If you have a lot of PDF forms, however, you may want to create an action in Acrobat that will run FormMagic on all of them with a single click. You can save a lot of time by running a batch FormMagic action on all these PDFs at once, instead of running FormMagic manually on each one.
The following link has all the details, and explains how to create a batch action in Acrobat to run FormMagic or FormMaker on multiple PDFs in one go: https://www.id-extras.com/formmagic-creating-a-batch-action-in-acrobat

David Tinsley
March 12, 2018 10:25 pmHello,
I have a 164 page document setup with text fields in the master pages on the document, every page will end up being a separate document, I was hoping to split the 164 page file into separate pages after everything is exported as one big PDF with 164 pages, then I was hoping to have the field names end up being the same in the seperate documents – for example, every page and separate document would have a field called “PROJECT”.
Currently when I export the PDF it appends “*.Page N” to all the instances of the fields on the actual pages when they are using fields from the Masters.
Sorry if my question is confusing, but can your software help with my issue? If I’m not being clear could you email me back with questions?
Thanks very much!
Ariel
March 13, 2018 12:39 amHi David,
I think your question is clear. That’s just how InDesign works. To avoid this behavior, you’d need to detach or override the text field on each document page. Luckily this is easy enough to do: Select all pages in the Pages panel, right click, and select “Override all master page items”.
FormMagic is great for adding formatting to the fields in InDesign that carries through to Acrobat, but for this specific problem it shouldn’t be necessary.
Ariel
Nic Andrews
November 11, 2019 1:51 amHi there, Awesome product!
Just wondering what the best way of defining the field order is? I’ve got text fields that aren’t just down the page but a combination of down and across. (The pricing for a menu item sits to the right of the menu item). this is super useful to get right so that my clients can just tab to get the to the next logical field.
Ariel
November 11, 2019 2:13 amHi Nic,
There are a couple of ways of setting the tab order natively in InDesign, so this is not strictly a FormMagic question.
I think this link is helpful: https://helpx.adobe.com/indesign/using/forms.html#Specifytaborder
Very glad to hear you’re enjoying the product! Let me know if you have any other questions.
Ariel
Michelle Myers
February 6, 2020 11:09 pmI have a text box in InDesign that is horz and vert centered and may contain one or two lines. (mulit-line and scrollable selected.
When export to interactive PDF, adjusts to 1 line top aligned.
Any settings to keep this centered horizontally if only one line?
Ariel
February 7, 2020 12:02 amHi Michelle,
Could you send me the PDF so I can take a look?
Thanks,
Ariel
Alan Morestain
January 11, 2021 2:38 pmHi Ariel,
i didn’t use Form Maker since version 1.7 and this version 3 is amazing (you’ve greatly improved it, i love it).
The ability to add javascript directly in ID is really time saving, but i can’t manage to use it :(
When i select the button frame and edit the Mouse Up action nothing appears in the Actions area.
I tried with my old files that need updates as well with a new file and it’s the same : nothing.
I’ve also got the same issue with comb fields : no effect when inserting pipes in a text field (old or new file)
I tried this with CC 2020 and 2021 (MacOS Big Sur).
Maybe i missed something (most of the times it’s that). but there may also be an install issue since i can’t create the menu item in both versions. I get an error message like this “An error occurred when attempting to set the menu preferences. Please make sure that you are running InDesign with Administrator permissions.”
I will send you my file with pleasure if you need.
Thanks for your help
Alan
Gerardo
January 29, 2021 2:33 amDoes the software support expandable text fields? Either way, once a form has been exported to interactive pdf, does it require flash to run?
Thanks!
Ariel
January 29, 2021 3:17 pmHi Gerardo,
I’m not sure what you mean by “expandable text fields”? InDesign’s interactive PDF export works with standard Acrobat forms, not the Adobe XML forms type, which require LiveCycle (I think).
But the answer to the 2nd question is no, nothing special is needed to open the interactive PDFs that are created with FormMaker – not Flash, no plugins, nothing. Just the free Adobe Reader, nothing else! That’s what’s good about it!
Ariel
Anet
May 10, 2021 6:26 pmHello Ariel,
first of all thank you for this script, my head had been exploding past few days from trying to make forms in InDesign alone.
I have some trouble though and was wondering if you could help me with them please.
After opening the interactive pdf from Indesign in Acrobat and running the script, following things go south:
1) text colour is black instead of the colour I choose in Indesign
2) the pdf from Id doesn’t seem to embedd font automatically – I tried on another computer and it is substituted with another font. Is it possible to do it manually? Or does the embedding happen later, in Acrobat?
3) I can’t seem to work out how to make a form field that can have more lines. When I make the text box big, it just puts the cursor in the middle and continues the sentence endlessly on one line :D
I tried to find the answers on this site but with no luck. Maybe I overlooked something, in that case a link to solution would be enough and very appreciated. Thank you again for your time and help.
Regards,
A.
Ariel
May 10, 2021 6:56 pmHi Anet,
This sounds strange.
Could you send me the InDesign file to check? Or at least the interactive PDF, before you’ve run FormMagic on it in Acrobat?
Re. (3) there is a setting in InDesign’s Buttons and Forms panel to make a text field “multiline.”
Thanks,
Ariel
Anet
May 10, 2021 7:13 pmEdit: 3) is solved now, found the Multiline checkbox, eh.
Jen Reddy
August 18, 2021 7:33 pmNot all of the paragraph and character settings are transferring from my indesign layout to the magicform layout. For example I want the text to be in a capital letters in the Title Name text box. But when I export the file to the interactive pdf and enter text it displays as lower case. How do I fix this?
Ariel
August 31, 2021 12:06 amHi Jen,
With FormMagic, you can apply only formatting that is supported by Acrobat directly, as specified at the top of this Help page (i.e., font, default text, colour, alignment, strikethrough, superscript, subscript, field rotation and comb fields).
To turn text into all-caps, you’d need a simple custom javascript added to your form, and, for that, you would need a subscription to FormMagic’s big brother, FormMaker (https://www.id-extras.com/products/formmaker/).
Once you’ve got your copy of FormMaker, the script to do the job is actually a simple one-line script that would need to be added as a custom “formatting” script:
Hope that helps!
Ariel
Marko Randelovic
October 17, 2021 10:33 amHello,
I purchased FormMaker 3.1.0. I export interactive fillable PDF from InDesign with the script. Then open the file in Acrobat and activate the script…but there is a font leading that doesn’t have the same parameters as I specified in InDesign.
Help, please!
Thanks in advance.
Marko
Ariel
October 17, 2021 12:01 pmHi Marko,
I’m not sure I understand the question. What does “a font leading” mean exactly?
Ariel
Marko Randelovic
October 17, 2021 8:02 pmI was asking if is possible to define 10pt text size and 14.2pt text interline for a fillable box?
Ariel
October 17, 2021 8:03 pmAh, I see. No, it’s not possible to set the interline spacing (leading) with FormMagic, unfortunately.
Marko Randelovic
October 17, 2021 11:20 pmOk, that’s sad :)
One more question, please.
I’m using the “Format” > “Date” > “Custom” > “dd” to indicate that in that field need to add just a date. I love that when clicking on the field in Acrobat it shows me the calendar but starting date is the year 2000…
How I can indicate that the starting date is 01.01.2022?
Thanks in advance Ariel!!
Ariel
October 18, 2021 4:46 pmIf you type into the text field (in InDesign) 01/01/2022, and then export with FormMaker, that becomes the default date of the date picker in Adobe Reader. The user will see “01” (because that’s the format you’re using), and when they click on the field to open the calendar it will home in on 01/01/2022.
(By the way, for me the default date (if the field is completely blank) that Adobe Reader displays is today’s date. When I clicked on the field without doing the above, 18 October 2021 (today) was selected. So I’m surprised it’s showing the year 2000 for you.)
IDL Advisors
February 2, 2022 6:34 pmAriel,
I am considering purchasing your product.
Curious, does FormMagic allow the setting of a form field to Calendar? I can insert that in Acrobat but would like to have that option in InDesign.
Thank you…
Ariel
February 2, 2022 7:52 pmHello!
When you say “calendar”, do you mean the date-picker widget?
I think that does work. If you apply the date format to a text field in InDesign with FormMaker, Adobe Reader will automatically show a date-picker when the user clicks in that field.
However, I’ve noticed that this does not work with Acrobat, only with the free Adobe Reader. As I’ve only got Acrobat installed, I can’t double-check. But IIRC I have, in the past, installed Reader specially to check this and I remember it working.
If you get a chance to test it, please post back to confirm.
You can test this also with the free version of FormMaker which is available to download.
Thanks,
Ariel
Bob
July 8, 2022 8:44 pmFormMaker is a great product and is saving us a lot of time in producing PDF forms for my client. I do have a question regarding Text Fields. I like that you can put default text in a field, but is there any way to create “ghosted” style text – i.e., greyed out text to display in a field when it contains no data? Some form engines provide this capability as a hint for end user to understand the format or other information about the field, and once they focus/start typing the field, the ghosted text disappears. I’m guessing that maybe this could be done with some combination of custom script but I’m just not that adept when it comes to those.
Ariel
July 9, 2022 10:38 pmHi Bob,
You’re right that it would need a custom script to get it to work. Also, this is the FormMagic help page, so just to clarify that you are indeed talking about FormMaker?
I haven’t tried doing this myself, but there seem to be some useful options to try here:
https://community.adobe.com/t5/acrobat-discussions/show-default-value-in-text-field-until-user-inputs-data/td-p/10003538
Do any of those work?
Sean
January 21, 2024 10:59 pmA couple of quick questions regarding FormMagic:
When you are finalizing the PDF for the end user, what needs to be doen? I’m assuming they do not need FormMagic themselves.
Any plans to add the ability to use Image Fields within InDesign? This is another feature that is desperately needed when creating forms.
Ariel
January 21, 2024 11:26 pmHi Sean,
(1) Finalizing: When you create the PDF with FormMagic, it opens in Acrobat, and then you need to run the FormMagic command at the bottom of the Edit menu in Acrobat. At that point, once you save the PDF, it’s done. The saved PDF can be distributed to anyone. It is a 100% regular PDF, and the end user does not need to have anything special installed on their computer, neither FormMagic nor even any fonts you’ve chosen for the interactive form fields.
(2) “Select an image” fields can be created with FormMaker (https://www.id-extras.com/products/formmaker/) easily, but not with FormMagic. Instructions here: https://community.adobe.com/t5/indesign-discussions/how-to-add-an-image-form-field-in-indesign/td-p/14178696#:~:text=page%20PDF%20forms.-,instructions%3A,-It's%20important
Duke De Dore
March 1, 2024 7:38 pmHello!
Do you have any experience with embedding fonts from fonts.adobe.com? Unfortunately I am unsuccessful with the font “FF Good Headline Pro”.
The documentation (https://www.id-extras.com/help/formmagic/) states that “Some fonts, though, do not allow such embedding, so it is important to test your PDF form on a computer that definitely does not have those fonts installed to see whether they have been successfully embedded.”.
I have tested it (unsuccessfully). Is there a non-optical test to find out if fonts allow embedding or not?
Ariel
March 3, 2024 12:46 pmHello!
I haven’t tried with all Creative Cloud fonts, so I can’t advise you about that. My guess is that they won’t work, as they are not quite like regular fonts installed on your computer, but perhaps some do.
The best way of checking whether a font can be embedded or not, is to try to apply it to a form field manually in Acrobat. When you do that, if there is an embedding problem, Acrobat shows an error.
For instance, when I try to apply “Good Headline Pro” to a form field in Acrobat manually (without FormMagic), a warning pops up: “The selected font cannot be embedded in the PDF file because of licensing restrictions. If the PDF file is viewed on a system that does not have this font installed, Adobe Acrobat will simulate the appearance of this font. To preview the simulated font appearance, turn off Edit > Preferences > Page Display > Use Local Fonts. To avoid this situation, use a font that can be embedded in the file or a font known to be installed on all systems where the PDF file will be viewed.”
So, quite wordy, but helpful in explaining the situation!