Auto Character Styles
This script is a sophisticated solution to every designer’s worst problem: catching all local overrides and converting them to character styles.
The user has the choice of which local overrides to convert to character styles. The aim is to minimize the amount of character styles created.
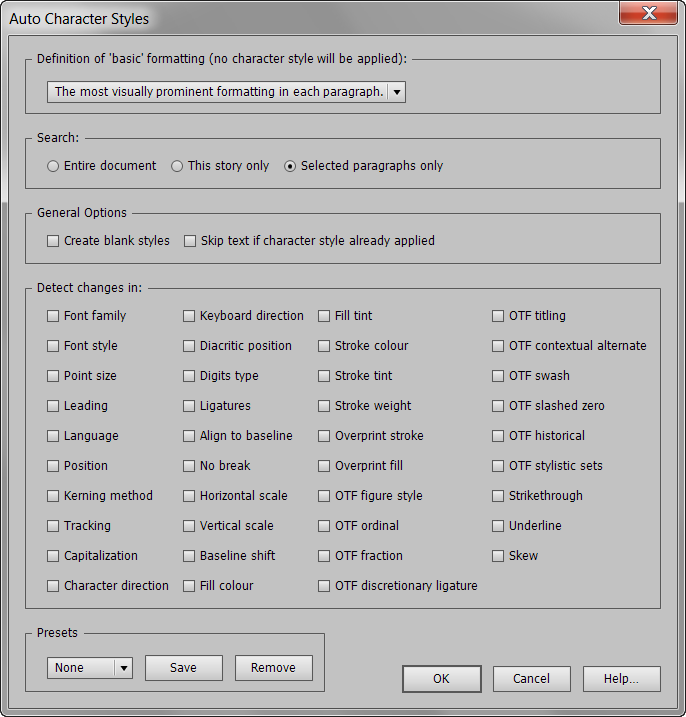
So for instance, if we’re only interested in catching variations of bold, italic, semibold etc., as well as say any underlining, one would select the “Font style” option at the top of the first column, and the “Underline” option at the bottom of the last column.
Once you’ve made your selection, you may save all settings as a preset.
The Create Character Styles script searches all text in the document, including tables and footnotes.
By default (since version 1.8), the script will create character styles and set the styles’ properties appropriately. So, for example, if the script generates an “Underline” character style, that style will be defined to apply underlining. The “Create blank styles” checkbox (see screenshot above), however, overrides this behavior. If selected, all character styles will be blank. For example, the above style will still be called “Underline,” but it will not have underline defined as one of its properties. This makes it easier in some cases for the designer to adjust the script-generated character styles to his or her needs.
The “Skip Text if Character Style Applied” option provides the option to tell the script to skip any text that already has a character style applied to it. Such text will only be skipped if the applied character style isn’t overriden.
For example, if you have a style called “10pt” applied to text, and that text is indeed 10pt in size, it will be skipped. But if, despite the applied style, the text is 20pt in size, Create Character Styles will consider that an override and will apply a new character style to it.
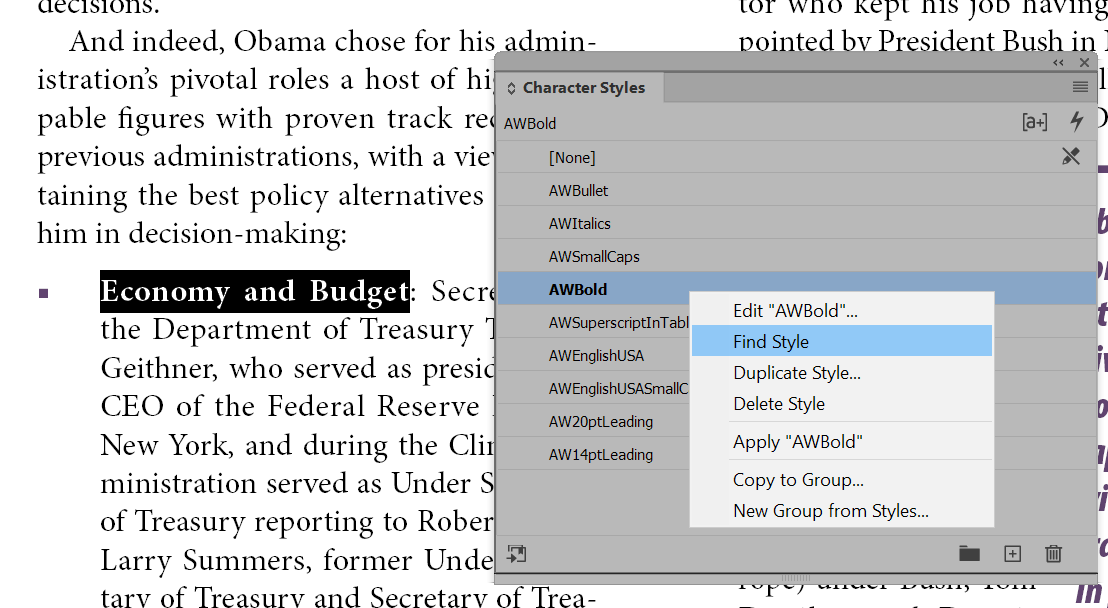
Below is a screenshot of the character-styles panel after running the script on a 128-page publication:
NEW! Bonus Feature: “Find Style”
Auto Character Styles now comes bundled with a “missing” InDesign feature: “Find Style.”
Right-click on any character style (or paragraph style) in the Character Styles or Paragraph Styles panels and you’ll see a new command: “Find Style.” Use this to be taken to the next instance of that paragraph style or character style in your document.
Once installed, this new command is available in all your documents, whether or not you have run Auto Character Styles.
One of the hassles of an add-on like Auto Character Styles is that it can create a lot of character styles! The new “Find Style” function is a real time-saver for weeding-out unwanted or redundant styles, and for many other uses.
Change how “Find Style” works by changing the current settings in InDesign’s Find/Change dialog. For instance, if Find/Change is set to search in the current story only, “Find Style” will work that way as well. Or if Find/Change is set to ignore master pages or footnotes (yes, there are options in Find/Change to do that!), “Find Style” will follow suit. So feel free to change the settings in InDesign’s Find/Change window as needed to get the result you want with “Find Style.”
“Find Style” comes bundled as a separate file, and must be placed in the Startup Scripts folder on your harddrive. More details about installing startup scripts, with screenshots, here: InDesign Startup Script Installation
Here’s a quick video just about this new bonus feature, “Find Style”:
Demo
To download a trial version, click here. The trial version is limited to 3-page, 1000-word documents.
Instant Download
To purchase the full version of Auto Character Styles for only $49, click the “Buy Now” button. Your product and serial numbers will be available for instant download when you complete the purchase.
Money-back Guarantee
If you are not satisfied with Auto Character Styles for any reason, simply let us know within 30 days of purchase for a full refund.


Rick
September 30, 2019 9:31 amSorry, can’t figure this out. I am placing a word document that I need to apply my own paragraphs styles to, but want to preserve italics and bold in the text. Can I do that?
Thanks,
Rick
Ariel
October 2, 2019 3:49 pmHi Rick,
You can certainly do it. In the script window, just tick the option that says “Font Style.” This will create and apply character styles to any text in your document that have italics and bold applied to them. It will also preserve any other variations (for instance, bold italics, oblique, condensed italics, etc. etc.).
But note: It is important to get the top option right as well, where it says “Definition of basic formatting.” In that dropdown, you tell the script what it should consider as “basic” formatting. For instance, if you select “the most visually prominent formatting in the paragraph,” and the paragraph is mainly formatted in bold, then Auto Char Styles won’t apply a style to the bold in that paragraph; rather, it will apply a “regular” style to the non-bold formatting in that style, since, for that paragraph, regular is the exception, not bold.
So if you do want to specifically catch all bold, even in paragraphs which are mainly bold already, choose a different option, perhaps the “The formatting defined by this paragraph style…” option, and then select a paragraph style from the ones in the document that is defined to have regular text. By doing so, the script will compare any text in the paragraph to the formatting defined by the selected paragraph style and apply the necessary styles to any text that is formatted differently. So if that paragraph style has regular, any text that has bold or italic or bold italic etc. will get a bold (or italic or bold-italic) character style applied to that text.
Does that make sense?
Ilja Stepanek
December 1, 2019 9:13 pmHello, after ID change to v.15.0 this tool is ending for:
“An error occured. The script must now quit. Error: Styl name must not contain brackets.”
But I am using bracket in styles for many years and AutoCharStyles2.5.1 worked without any problem.
Thx a lot for help
Ariel
December 1, 2019 9:22 pmHi Ilya,
Hmm, not sure if this was possible in earlier versions – you’re saying it was, but I seem to remember that square brackets [ ] was never possible.
In any case, just tried it now manually in InDesign 2020 and InDesign doesn’t allow a style name to begin with a bracket, even through the UI. So I guess it’s just not possible.
Ariel