
Create Highschool Yearbooks in InDesign

Yearbooks have two main parts. The fun part is creative, designed, free, and needs a human designer!
But the bulk of many yearbooks is the section that includes the many pages of standard photos of kids and staff, arranged in rows and columns. Each photo usually has the person’s name beneath it.
In this section, students are usually sorted by grade, with each grade starting on a fresh spread. Within each grade, students are usually arranged alphabetically.
There can easily be hundreds of pictures in this section.
At least in the US, school photographers have a standard way of arranging the photos on disc. A datafile accompanies the graphic files, where each grade has it’s own subfolder.
The datafile is essentially a .csv (comma delimited file) that includes columns for first name, last name, grade, and name of photo.
The graphic designer then has the Sisyphean task of placing the photos onto InDesign spreads, matching each photo with the correct caption, dividing the kids according to grades, and sorting them alphabetically (they are sorted in the data file neither according to grade nor alphabetically).
If latecomers (kids who were absent on the day yearbook photos were taken) must be inserted later, it can be difficult to rearrange everything. Likewise if deletions need to be made.
I was approached a while ago by a yearbook company who were wondering if this part of the yearbook, at least, couldn’t be automated.
The answer, of course, was yes. And thus Yearbook Creator, an InDesign add-on for effortlessly creating yearbooks in InDesign, was born.
Yearbook Creator
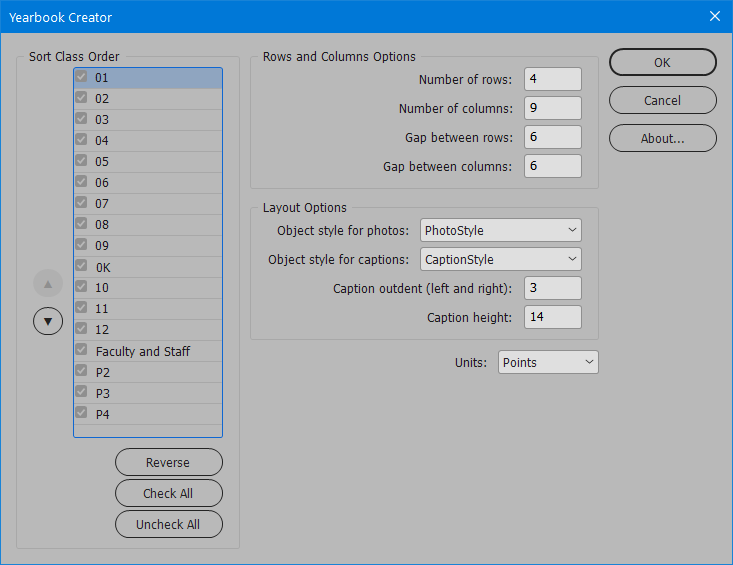
Yearbook Creator is PSPA-ready. It expects to receive the database files according to the standard set by the Professional School Photographer’s Association. If you do not have a PSPA-ready data file, though, no worries! It is easy to make by hand, in Excel. See below for more details. Yearbook Creator makes light work of laying out the photo-grid section. It reads the datafile, sorts it according to grades, allows the user to choose which grades to include and which to exclude, allows the user to specify basic layout parameters (size of live area on the page, number of columns and rows per page, distance between columns and rows, etc.), and within seconds builds the finished pages.
But it doesn’t end there. Because Yearkbook Creator was programmed by someone who is actually familiar with InDesign and uses it daily (yours truly), it builds the pages using best practice.
This means that photos can easily be added or deleted, and all other photos shift to close the gap or make room!
It means that it is easy to make space for a headline on a page, or a feature image.
InDesign is a powerful program if used correctly, and Yearbook Creator takes full advantage of this to create layouts that are really easy to work with and change and adapt.
So if you’re working on yearbooks in InDesign, click on the button below to grab your copy of Yearbook Creator! I think you’ll be excited when you see what a quick and easy job it makes of what used to be the hardest part of making a yearbook in InDesign!
No PSPA-ready data file? No worries!
Yearbook Creator works out of the box when your photo files are arranged in accordance with PSPA guidelines (Guidelines for Portrait CDs). If they are not, though, starting from version 1.1 of Yearbook Creator, it is easy to create an Excel datafile that will work.
All you need is an Excel file (make sure to save it as a .csv file, not an .xlsx file) with at least 5 columns, with the following headings. The columns can be in any order, but it is important that the headings at the top of the columns be exactly as follows: Folder, Filename, Last Name, First Name, Homeroom
For each row of the file (one row per person), in the Folder column should appear the name of the folder that contains the image (the “mugshot”). If the folder of the image is in the same directory as the datafile itself (as per PSPA guidelines), just type the name of the folder (this is known as a “relative” path). If the folder is elsewhere on your computer, type the full path (not including the image filename) here. (This is known as an “absolute” path.) Example: “Grade10” (relative path), or “C:/Users/Dan/Yearbooks/Grade10” (absolute path, Windows) or “/Users/Dan/Yearbooks/Grade10” (absolute path, Mac).
For each row of the file, under the Filename heading, type the exact name of the image to use. E.g., photo123.jpg.
The First Name and Last Name columns should contain the first names and last names of the students or staff, and the Homeroom column should include the grade of the students, or the word “Staff” (or any other description you like).
Here’s an example of a valid Excel (.csv) file. It has more than 5 columns, but that’s fine. So long as it has the 5 required columns (Folder, Filename, Last Name, First Name, Homeroom), in any order, the other columns make no difference and will be ignored.

Carmel Crane
March 1, 2023 11:20 pmWe are creating a yearbook in InDesign but need to add a new student in the middle of a class. I watched a video where you describe a script that can be added to make this process easier. How might I find and use this script?
Thanks!
Ariel
March 8, 2023 11:02 pmHi Carmel,
Well, Yearbook Creator is available for purchase on this page.
If you use it to create your yearbook pages, adding or removing a latercomer is as easy as cutting and pasting. All the other pictures will shift to fill the gap or make extra space automatically.
I show the process in the YouTube video you refer to.
But it does require using Yearbook Creator to create the pages.
Evan
May 6, 2022 10:30 pmQuestion: What is determining the position of the image container? I am trying to have less white space between rows.
Ariel
May 7, 2022 11:14 pmHi Evan,
The photos and captions are grouped together for each student. They are then placed as inline objects in a text frame. So, it’s the size of that text frame that determines the position of the photos. If you need less white space, either make the containing text frame shorter, or add more rows of photos in the settings dialog.
evan
May 5, 2022 9:01 pmYou are so helpful. Thank you!!
Evan
May 5, 2022 7:57 pmFigured out the relink so thank you. Another question: Is there a way to control where the student’s name shows up. Right now, I have too much space between the photo and the name.
Ariel
May 5, 2022 8:48 pmIt should be possible to modify things by changing the definition of the object style that applies to the text frame with the name. For instance, you could change the “first baseline” option of the Caption object style to the “Fixed” settings, and that would give you complete control over the vertical positioning of the name.